
What happens when you take the nostalgic, comforting embrace of banana pudding and combine it with the rich, elegant decadence of cheesecake? You get a dessert so spectacular, so unbelievably delicious, that it deserves its own spotlight. It’s the kind of brilliant idea that makes you wonder why you haven’t been doing it all along.
Forget choosing between two of the world’s most beloved desserts. We’re about to merge them into one stunning, single-serving treat: Banana Pudding Cheesecake Cups. These individual parfaits are the perfect solution for parties, gatherings, or any time you want to serve something that looks as amazing as it tastes.
Get ready to layer your way to dessert perfection. This recipe is your ticket to becoming a potluck hero, the host with the most impressive dessert buffet. Let’s create these beautiful little pies in a cup together.
What Are Banana Pudding Cheesecake Cups?
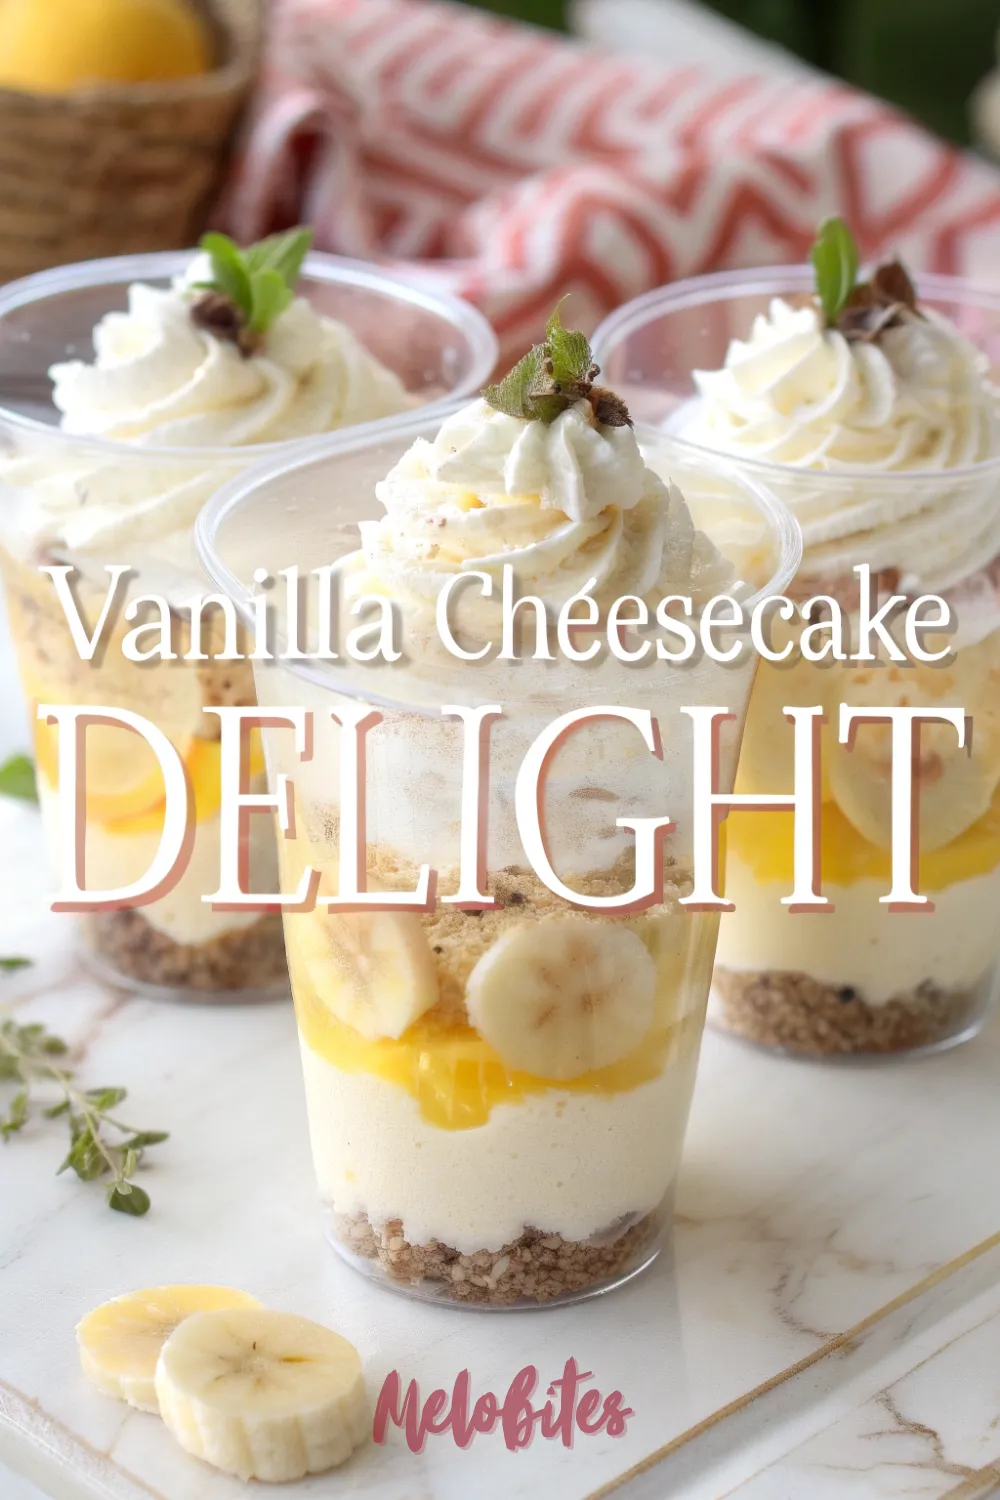
Imagine a personal dessert adventure in a glass. At the very bottom, you’ll discover a buttery, crunchy crust made from classic vanilla wafers. This provides the perfect textural foundation for the creamy layers that await you above.
Next is the star of the show: a luscious, no-bake cheesecake filling that’s been infused with the sweet flavor of banana cream pudding. Tucked within this velvety filling are slices of fresh, sweet banana, offering a soft bite and authentic fruit flavor. The whole creation is then crowned with a fluffy dollop of whipped cream and a single wafer for that classic look.
A Creamy Cheesecake Dessert for Dessert Cups Recipes
When it comes to dessert cups recipes, the goal is to create something that is both beautiful and practical. This creamy cheesecake dessert hits all the right notes. Serving desserts in individual cups or jars instantly elevates their appearance, turning a simple treat into an elegant affair.
This approach also makes serving an absolute breeze, especially for a crowd. There’s no messy slicing or scooping required; guests can simply grab their own personal dessert and enjoy. It’s a fantastic strategy for managing portion control and ensuring everyone gets a perfect piece every single time.
How to Keep Bananas from Browning in a Dessert
The biggest challenge when working with fresh bananas is the dreaded browning. So, how do you keep bananas from browning in a dessert? The answer is to fight a simple chemical reaction called oxidation with a little bit of acid.
Before you layer your banana slices into the cups, gently toss them with a very small amount of fresh lemon or pineapple juice. The citric acid creates a barrier that significantly slows down the browning process, keeping your bananas looking fresh and appetizing for hours. This simple trick is the key to a picture-perfect presentation.
Why You’ll Love These Banana Pudding Cheesecake Cups
First off, the single-serving presentation is a game-changer for entertaining. These cups look incredibly chic and impressive lined up on a dessert table. They give off a “gourmet bakery” vibe that will have your guests thinking you spent all day in the kitchen.
Furthermore, this is a completely no-bake recipe, which means you can whip up an extraordinary dessert without ever heating up your house. It’s the perfect cool and creamy treat for warm weather gatherings. The convenience of a make-ahead, no-bake recipe is a high rate of return on your time.
Nutritional Benefits
While this is certainly a treat, it brings a few nutritional perks to the table, thanks to its star fruit. Bananas are a fantastic source of potassium, an essential mineral that helps regulate blood pressure and muscle function. They also provide dietary fiber, which is important for digestive health.
The dairy components, like cream cheese and milk, offer a good amount of calcium for strong bones. By incorporating real fruit, you’re making a dessert choice that feels a little more wholesome and satisfying. It’s a beautiful balance of indulgence and goodness.
Full Recipe for Banana Pudding Cheesecake Cups
Here is the complete, step-by-step guide to assembling these stunning individual desserts. Follow along to create a treat that is sure to impress.
❖ Prep Time: 30 minutes | Chill Time: 4 hours | Total Time: 4 hours 30 minutes | Yield: 8-10 servings | Category: Dessert | Method: No-Bake, Chilling | Cuisine: American | Diet: Vegetarian
Essential Ingredients for Banana Pudding Cheesecake Cups
For the Crust:
- 2 cups vanilla wafer crumbs (about 80 wafers, finely crushed)
- 6 tablespoons unsalted butter, melted
For the Cheesecake Filling:
- 1 (8-ounce) package full-fat block cream cheese, softened
- 1 (3.4-ounce) package banana cream instant pudding mix
- 1 cup cold whole milk
- 1 (8-ounce) container frozen whipped topping (like Cool Whip), thawed
- 1/4 cup powdered sugar
For Assembly and Topping:
- 3-4 ripe yet firm bananas
- 1 teaspoon fresh lemon juice (optional, to prevent browning)
- Additional whipped topping for garnish
- Whole vanilla wafers for garnish
Ingredients Notes
- Vanilla Wafers: The classic Nilla Wafer is the traditional choice for banana pudding and works perfectly here. Its crisp, vanilla-scented profile creates the ideal crust.
- Cream Cheese: Use full-fat, block-style cream cheese for the best results. It needs to be completely softened to room temperature to ensure your filling is silky smooth and free of any lumps.
- Banana Cream Pudding: Using banana-flavored instant pudding mix infuses the entire cheesecake layer with that authentic banana pudding taste. It’s a simple shortcut that delivers a huge flavor payoff.
- Bananas: Choose bananas that are ripe for sweetness but still firm enough to hold their shape when sliced. Overripe, mushy bananas will not work well for the layered component.
How to Make Banana Pudding Cheesecake Cups (Detailed)
- Prepare Your Cups: Select 8-10 small glass cups, jars, or trifle bowls (about 6-8 ounces each). Set them out on your counter so they are ready for assembly.
- Make the Crust: In a small bowl, combine the vanilla wafer crumbs with the melted butter. Mix with a fork until all the crumbs are moistened. Spoon about 2 tablespoons of the crust mixture into the bottom of each cup and gently press it down to create an even layer.
- Create the Cheesecake Filling: In a large bowl, use a hand mixer to beat the softened cream cheese and powdered sugar until completely smooth and creamy. Add the dry banana cream pudding mix and beat on low speed until it’s just combined.
- Finish the Filling: Slowly stream in the cold milk while mixing on low speed. Once the milk is incorporated, increase the speed to medium and beat for about 2 minutes, until the mixture is thick and smooth. Gently fold in the thawed whipped topping until no streaks remain.
- Prepare the Bananas: Slice your bananas into 1/4-inch thick rounds. If desired, gently toss them in a small bowl with the lemon juice to prevent browning.
- Assemble the Layers: Spoon or pipe a layer of the cheesecake filling over the crust in each cup. Top with a single layer of banana slices. Add another layer of cheesecake filling on top of the bananas.
- Chill for Perfection: Cover the cups with plastic wrap and refrigerate for at least 4 hours, or until the filling is fully set. This chilling time is crucial for the flavors to meld.
- Garnish and Serve: Just before serving, top each dessert cup with a dollop of additional whipped topping and a whole vanilla wafer.
Alternative Recipe: Strawberry Shortcake Cheesecake Parfait
For a fresh and fruity alternative, this strawberry shortcake version is just as beautiful and delicious.
- The Crust: Swap the vanilla wafers for 1 ½ cups of crushed shortbread cookies mixed with 5 tablespoons of melted butter.
- The Filling: Prepare the cheesecake filling using a (3.4-ounce) package of cheesecake or vanilla instant pudding mix instead of banana cream.
- The Fruit Layer: In a bowl, gently toss 2 cups of sliced fresh strawberries with 2 tablespoons of granulated sugar. Let them sit for about 15 minutes until they release their juices (this is called macerating).
- The Assembly: Layer the shortbread crust, cheesecake filling, and the juicy macerated strawberries in your cups. Chill and top with whipped cream and a fresh strawberry half before serving.
Storage Options
These dessert cups should be stored in the refrigerator. Cover each cup individually with plastic wrap or arrange them on a tray and cover the whole tray. They are best enjoyed within 2 days, as the bananas will start to soften and brown over time, even with the lemon juice trick.
For the best presentation, it’s recommended to add the final whipped cream and wafer garnish just before you plan to serve them. This ensures the whipped cream is fluffy and the cookie is crisp.
Variations and Substitutions
One of the best things about dessert cups recipes is how easy they are to adapt. Feel free to play with the components to match your taste or what you have on hand.
- Crust Alternatives: Graham cracker crumbs, crushed digestive biscuits, or even a chocolate cookie crumb base would be delicious alternatives.
- Flavor Drizzles: Before adding the final whipped cream topping, drizzle a layer of caramel sauce, dulce de leche, or melted chocolate over the cheesecake filling.
- Nutty Crunch: Add a sprinkle of chopped toasted pecans or walnuts on top of the banana layer for an extra layer of texture and flavor.
Practical & Valuable Tips
For perfectly neat and clean layers, use a piping bag (or a large zip-top bag with the corner snipped off) to pipe the cheesecake filling into the cups. This gives you much more control than spooning it in and prevents smudges on the inside of the glass.
Make sure your cream cheese is truly at room temperature. Cold cream cheese is the number one cause of a lumpy filling. If you’re short on time, you can unwrap the block and microwave it in 10-second intervals until it’s soft.
While you can serve these after 4 hours, the flavors get even better if you let them chill for 6-8 hours. This gives the banana flavor time to infuse the creamy cheesecake filling more deeply, creating a more cohesive and delicious dessert.
Frequently Asked Questions
- Can I make this as one large dessert instead of in individual cups? Yes, you certainly can! Simply assemble all the layers in an 8×8 inch square baking dish or a medium-sized trifle bowl. You will then need to scoop it out to serve, but the flavor will be just as amazing.
- How far in advance can I make these cups? You can assemble them up to 24 hours in advance. However, for the freshest-looking bananas, it’s best to assemble them on the day you plan to serve them. The crust and filling can be made a day ahead and stored separately if you want to break up the prep time.
- My cheesecake filling seems a bit thin. Will it set up? Yes, it will. The instant pudding mix contains starches that will cause the filling to thicken and set considerably as it chills in the refrigerator. Just be patient and give it the full 4 hours of chill time.
- Can I use fresh whipped cream instead of frozen whipped topping? You can, but you will want to stabilize it first. To do this, whip 1 ½ cups of heavy cream with ½ cup of powdered sugar and 1 teaspoon of vanilla. Once soft peaks form, sprinkle in 2 tablespoons of dry instant vanilla pudding mix and continue whipping until stiff peaks form.
- What kind of bananas are best for this recipe? You want bananas that are perfectly yellow, perhaps with a few tiny brown specks. These will be sweet and flavorful but still firm enough to slice neatly. Avoid green-tinged bananas (not sweet enough) or heavily browned, mushy bananas (too soft).
These Dessert Cups Recipes: Banana Pudding Cheesecake Cups are the perfect way to combine two beloved classics.
Ready to create the most talked-about treat at your next event? Pin this Banana Pudding Cheesecake Cups recipe to your dessert board and prepare for the compliments to roll in!


Leave a Comment