Have you ever found yourself in a dessert dilemma? You’re craving something sweet and satisfying after a wonderful meal, but the thought of a heavy, overly rich cake or a complicated pastry just feels like too much. You want elegance without effort, and indulgence without the subsequent food coma.
It’s in these moments that we need to turn to nature’s original desserts: fruit. And in the heart of autumn, when the air is crisp and cozy, there is no fruit more poised for a starring role than the humble pear. What if I told you that with just a few simple ingredients and less than ten minutes of active work, you could create a dessert that is breathtakingly beautiful, incredibly delicious, and surprisingly healthy?
Get ready to meet your new favorite fall recipe: spiced baked pears. This isn’t just a dessert; it’s a sensory experience that will fill your home with the intoxicating aroma of cinnamon and caramelized fruit. It’s a dish that proves, once and for all, that the most sophisticated flavors are often the simplest.
The Understated Star of Pear Dessert Recipes
When you explore the world of pear dessert recipes, you’ll find everything from complex tarts to dense cakes. But the true magic of the pear is often lost when it’s hidden under layers of flour and sugar. This recipe strips all that away and lets the pear shine in its purest form.
Baking the pear coaxes out its natural sugars, softening it to a buttery, melt-in-your-mouth texture while concentrating its delicate, floral flavor. It’s a celebration of the fruit itself, a simple yet profound transformation that feels both rustic and refined. This is the kind of recipe that reminds you how incredible simple, high-quality ingredients can be.
A Sophisticated Answer to Easy Fall Sweet Treats
As the seasons change, our cravings shift towards warmth and comfort, and our kitchens fill with the promise of easy fall sweet treats. These spiced baked pears are the epitome of that promise. They deliver all the cozy, warming flavors of autumn without any of the fuss or heavy lifting of a traditional baked good.
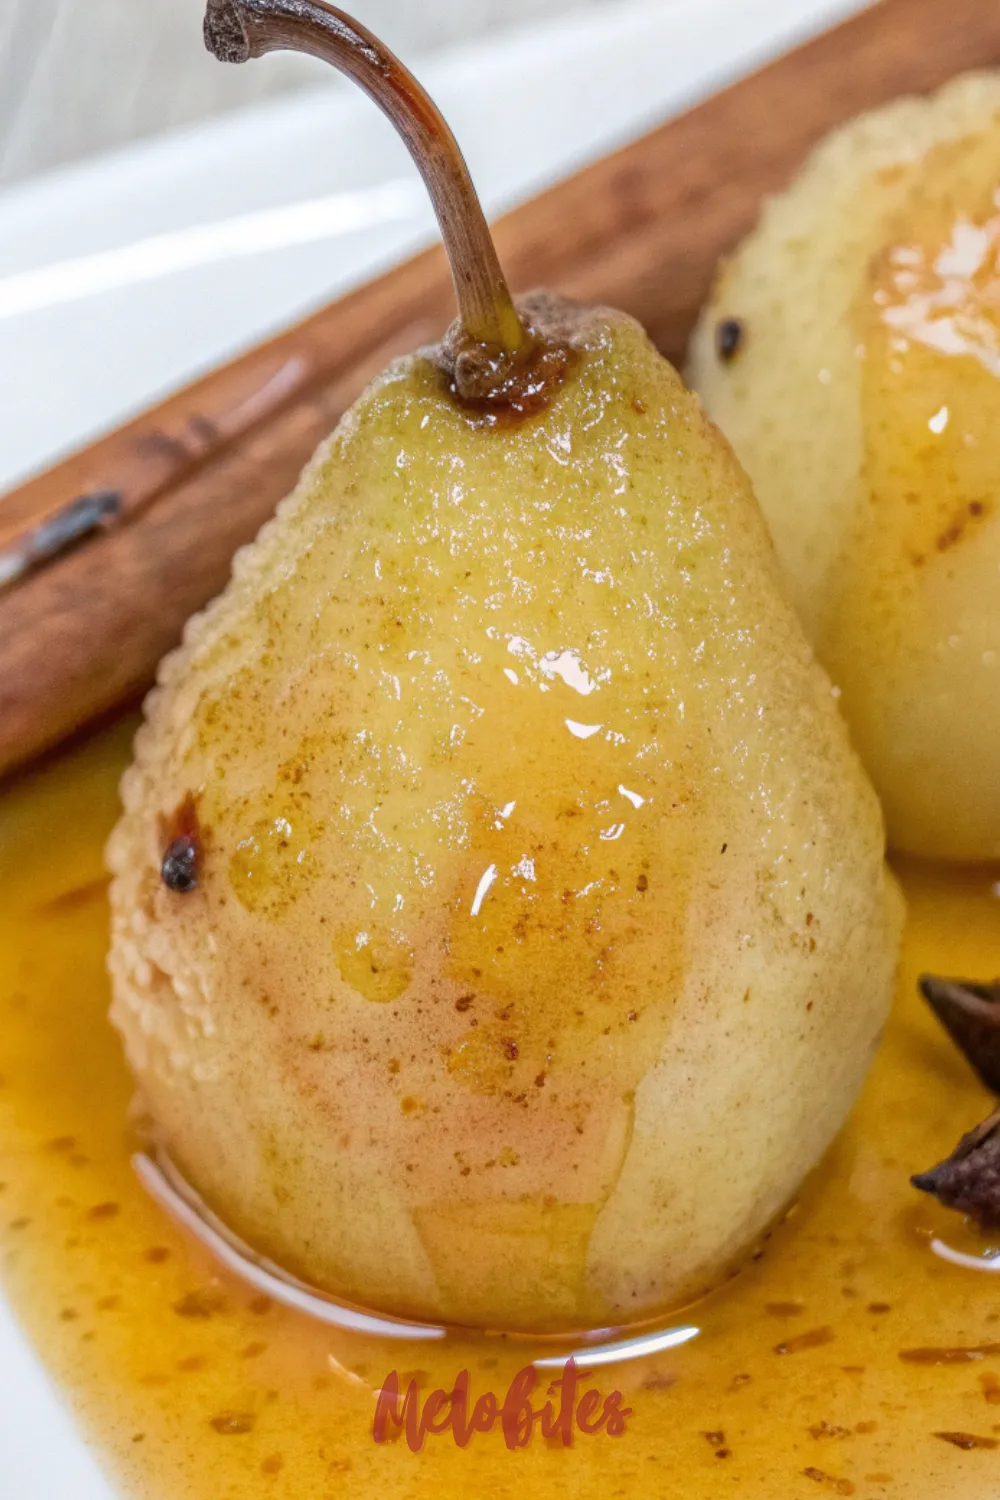
The process is almost laughably simple, yet the result is something you would be proud to serve at the most elegant dinner party. The pears emerge from the oven glistening and golden, swimming in their own fragrant, spiced syrup. It’s a testament to the fact that you don’t need hours of work to create something truly special.
A Fantastic Healthy Dessert Idea That Feels Indulgent
In a world of calorie-laden desserts, finding a fantastic healthy dessert idea that doesn’t feel like a compromise can be a challenge. These baked pears are the answer you’ve been looking for. They are naturally sweetened with just a touch of maple syrup and derive their incredible flavor from fruit and spices, not from heaps of butter and sugar.
This makes them the perfect light dessert to serve after a heavy meal, like a holiday feast or a rich Sunday roast. They satisfy your sweet tooth in a gentle, nourishing way, leaving you feeling content and comforted, not weighed down. It’s a guilt-free indulgence that feels anything but.
Why You’ll Fall in Love with These Baked Pears
- Effortlessly Elegant: This dessert looks stunning and sophisticated, making it perfect for special occasions, yet it’s simple enough for a weeknight treat.
- Incredibly Simple to Prepare: With less than 10 minutes of hands-on time, this is one of the easiest desserts you will ever make. The oven does all the work.
- A Feast for the Senses: The aroma of the baking pears and warm spices will fill your home with the most incredible, cozy scent.
- Naturally Healthy and Light: It’s gluten-free, easily made vegan, and celebrates the natural sweetness of fruit for a wholesome yet satisfying dessert.
The Nourishing Side of a Sweet Finish
It’s always a joy when a delicious dessert also happens to be good for you. Pears are a fantastic source of dietary fiber, which is essential for digestive health and helps you feel full and satisfied. They are also packed with important nutrients like Vitamin C, Vitamin K, and potassium.
The warm spices we use are more than just flavor enhancers. Cinnamon is renowned for its anti-inflammatory properties and its potential to help regulate blood sugar levels. This dessert is a beautiful example of how food can be both a pleasure and a source of nourishment.
The Full Recipe for Elegant Spiced Baked Pears
This is your complete guide to creating a simple yet stunning dessert that captures the essence of autumn. This recipe is designed to be fool proof and flexible, resulting in perfectly tender and flavorful pears every single time.
❖ Prep Time: 10 minutes | ❖ Cook Time: 30-40 minutes | ❖ Total Time: 40-50 minutes | ❖ Yield: 4 servings | ❖ Category: Dessert | ❖ Method: Baking | ❖ Cuisine: International | ❖ Diet: Gluten-Free, Vegetarian
Essential Ingredients for Spiced Baked Pears
- 2 large, firm Pears (like Bosc or Anjou)
- 2 tablespoons Pure Maple Syrup
- 1 tablespoon Unsalted Butter, melted (or coconut oil for vegan)
- ½ teaspoon Ground Cinnamon
- ¼ teaspoon Ground Nutmeg
- Pinch of Ground Ginger
- Pinch of Salt
- ½ cup Hot Water (or apple cider for more flavor)
Ingredients Notes
- The Perfect Pear: The type of pear you choose is important. Bosc or Anjou pears are ideal because they are firm and hold their shape beautifully during baking, preventing them from turning to mush.
- Ripe But Firm: Select pears that are ripe but still firm to the touch. An overripe pear will fall apart in the oven, so look for one that has a slight give near the stem but is otherwise solid.
- Sweetener Choices: Pure maple syrup lends a wonderful, earthy sweetness that complements the pears perfectly. You can also use honey or a sprinkle of brown sugar if you prefer.
- Baking Liquid: Using hot water in the bottom of the pan creates steam, which helps the pears cook gently. For an extra layer of flavor, you can substitute the water with apple cider, orange juice, or even a sweet white wine.
How to Make Elegant Spiced Baked Pears (The Detailed Guide)
- Preheat and Prepare: First, preheat your oven to 375°F (190°C). Choose a small baking dish that will hold the four pear halves snugly without too much extra space.
- Prep the Pears: Wash and dry your pears thoroughly. Using a sharp knife, carefully slice them in half lengthwise, from the stem down to the base.
- Core the Halves: Use a melon baller or a small spoon to gently scoop out the core and seeds from the center of each pear half, creating a small well.
- Arrange in the Dish: Place the pear halves cut-side up in your prepared baking dish.
- Mix the Spiced Syrup: In a small bowl, whisk together the maple syrup, melted butter (or coconut oil), cinnamon, nutmeg, ginger, and salt until well combined.
- Brush with Flavor: Using a pastry brush, generously brush this spiced syrup mixture over the cut surface of each pear half, allowing some of it to pool in the cored-out center.
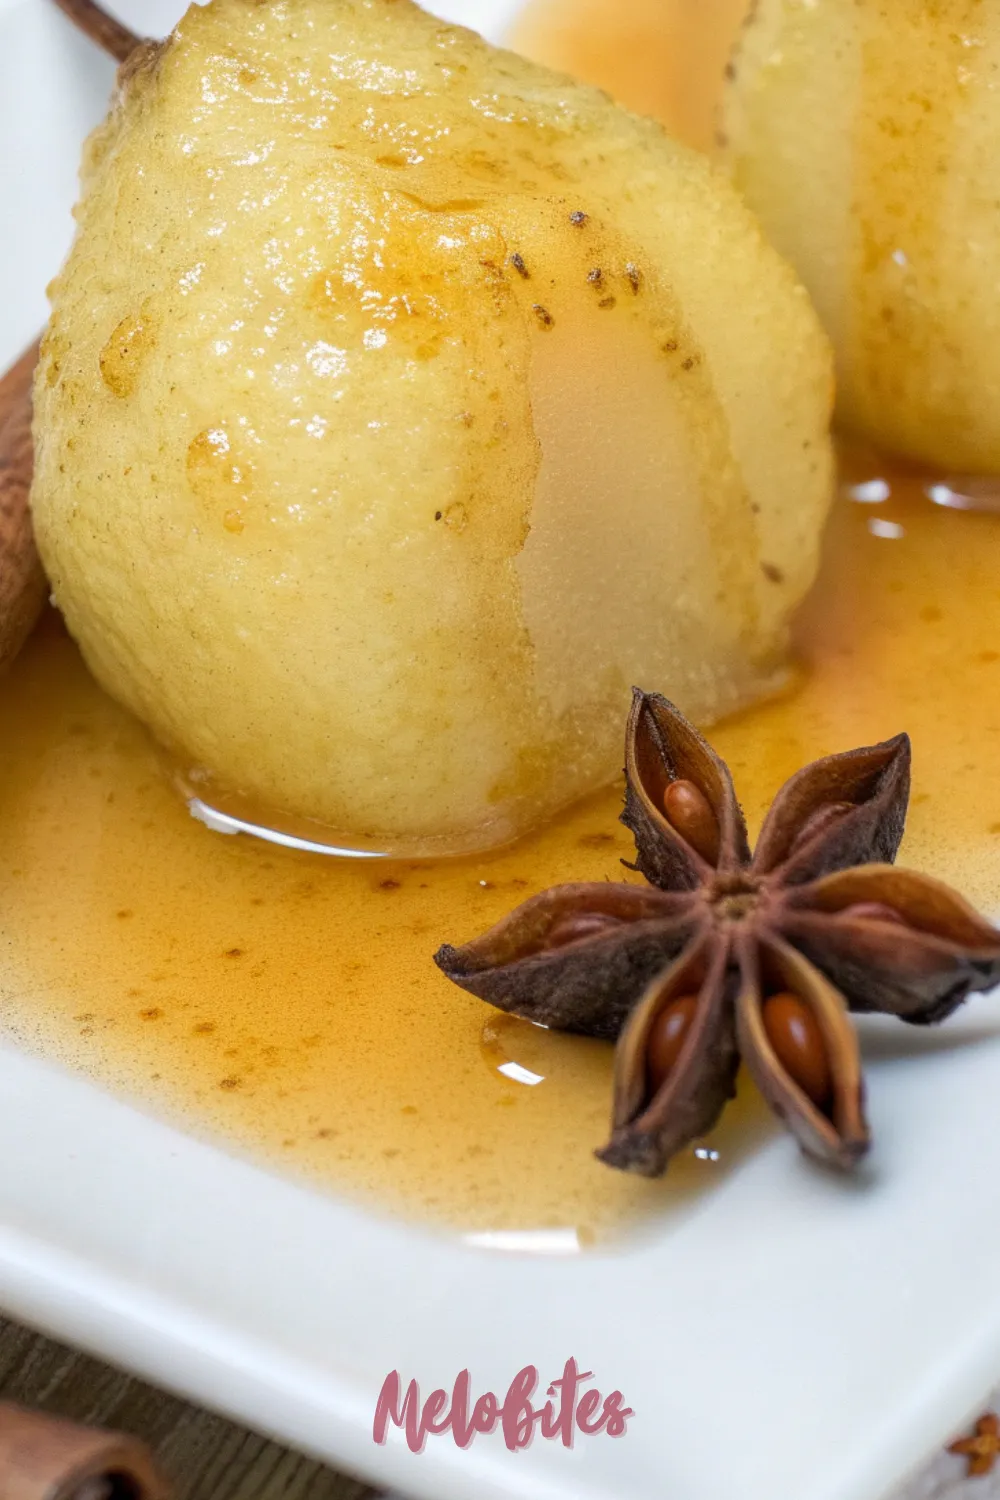
- Add the Baking Liquid: Carefully pour the ½ cup of hot water or apple cider into the bottom of the baking dish, around the pears. This will prevent the sugars from burning and create a lovely syrup as it bakes.
- Bake to Tender Perfection: Place the dish in the preheated oven and bake for 30 to 40 minutes. The pears are done when they are tender enough to be easily pierced with a fork and the edges are lightly caramelized.
- Baste for a Beautiful Glaze: About halfway through the baking time, use a spoon to baste the pears with the liquid from the bottom of the pan. This will create a beautiful, glossy glaze.
- Serve Warm: Carefully remove the dish from the oven. Serve the pears warm, with an extra spoonful of the pan syrup drizzled over the top.
Alternative Recipe: The Walnut & Oat Crumble-Stuffed Pears
For a heartier, more rustic version that feels like a cross between a baked pear and an apple crisp, this crumble-stuffed variation is pure comfort. Investing a few extra minutes in this topping yields an incredible return in flavor and texture, a smart financial decision for your dessert portfolio.
For the Pears:
- Use the same ingredients and preparation method as the original recipe.
For the Crumble Stuffing:
- ¼ cup Old-Fashioned Rolled Oats
- ¼ cup Chopped Walnuts or Pecans
- 2 tablespoons All-Purpose Flour
- 2 tablespoons Packed Light Brown Sugar
- ½ teaspoon Ground Cinnamon
- 2 tablespoons Cold Unsalted Butter, cut into small pieces
Instructions:
- Prepare the pears by halving and coring them as directed in the original recipe. You may want to scoop out a slightly larger well to make room for the stuffing.
- In a small bowl, combine the oats, chopped nuts, flour, brown sugar, and cinnamon.
- Add the cold butter pieces and use your fingertips to rub the butter into the dry ingredients until a crumbly, sandy mixture forms.
- Arrange the pear halves in the baking dish. Mound the crumble stuffing into the well of each pear half.
- Instead of brushing the pears with syrup, simply drizzle the 2 tablespoons of maple syrup evenly over the crumble topping on each pear.
- Pour the ½ cup of hot water or apple cider into the bottom of the dish.
- Bake at 375°F (190°C) for 35-45 minutes, until the pears are tender and the crumble topping is golden brown and crisp.
Storage Options for Your Baked Pears
If you have any leftover baked pears, they store beautifully. Allow them to cool completely, then place them in an airtight container along with any remaining pan syrup. They will keep in the refrigerator for up to 4 days.
You can enjoy them cold straight from the fridge, or you can reheat them gently. Place them in a microwave-safe dish and heat for 30-60 seconds, or warm them in a small oven-safe dish at 350°F (175°C) for about 10 minutes until heated through.
Variations and Substitutions
- Add Dried Fruit: Tuck a few cranberries, raisins, or chopped dates into the center of the pears before baking for a chewy, sweet surprise.
- Go Savory: For a sophisticated appetizer, omit the maple syrup and cinnamon. Instead, drizzle with olive oil, season with salt and pepper, and tuck a sprig of thyme or rosemary into the center. After baking, top with crumbled blue cheese or goat cheese.
- A Splash of Spirit: Add a tablespoon or two of brandy, rum, or a dessert wine like port to the liquid in the bottom of the pan for a rich, complex flavor.
- Citrus Zest: Add the zest of half an orange or lemon to the spiced syrup mixture for a bright, fresh note that cuts through the sweetness.
Practical & Valuable Tips for Success
- Level the Bottoms: If your pear halves are wobbly, carefully slice a tiny sliver off the rounded bottom of each one to create a flat, stable base so they don’t tip over in the dish.
- Don’t Skip the Basting: Basting the pears with the pan juices halfway through is the key to developing that beautiful, shiny, caramelized glaze.
- Serving Suggestions: These pears are divine on their own, but they are absolutely heavenly served with a scoop of vanilla bean ice cream, a dollop of Greek yogurt or mascarpone cheese, or a sprinkle of granola for crunch.
- Know Your Pears: Baking times can vary depending on the size and ripeness of your pears. Start checking for tenderness around the 30-minute mark to ensure they don’t overcook.
Frequently Asked Questions
- What are the best types of pears for baking? Firm, dense pears are best as they hold their shape. Bosc pears are the top choice, with their brown skin and crisp texture. D’Anjou (both red and green) are also excellent options.
- Do I need to peel the pears before baking? No, you don’t have to! The skin softens beautifully during baking and helps the pear halves hold their shape. Plus, the skin contains a lot of fiber and nutrients, and the color can be quite beautiful.
- Can I make these spiced baked pears ahead of time? Yes, you can. You can bake them a day or two in advance and store them in an airtight container in the refrigerator. Simply reheat them gently in the oven or microwave before serving.
- My pears were still hard after 40 minutes of baking. What went wrong? This likely means your pears were underripe to begin with. If your pears are very hard, they will simply need a longer baking time. Just keep them in the oven, basting occasionally, until they are fork-tender.
- What can I do with the leftover syrup from the pan? That syrup is liquid gold! Don’t throw it away. Drizzle it over the served pears, or save it and pour it over ice cream, oatmeal, or pancakes the next morning. It’s absolutely delicious.
These elegant Pear Dessert Recipes: Spiced Baked Pears are a testament to the beauty of simple, seasonal cooking.
If this recipe for simple sophistication has inspired you to embrace the elegance of fruit-based desserts, make sure you keep it handy. Pin it to your favorite fall recipes or healthy dessert board on Pinterest and share this little secret of effortless entertaining with everyone you know!


Leave a Comment