
Hello, my friends. Let’s talk about the most stressful decision of the entire holiday season.
No, it’s not the seating chart. It’s the dessert table.
You’ve got the classic, non-negotiable pumpkin pie, a sacred tradition. But then, standing right next to it, is the rich, tangy, decadent cheesecake. How in the world are you supposed to choose? It’s an impossible dilemma.
For years, I’d stand there with two plates, feeling a little guilty. But what if I told you that you don’t have to choose? What if I told you the answer isn’t “either/or,” but “both/and”?
Welcome to the ultimate holiday dessert mashup: the Pumpkin Pie Cheesecake. This isn’t a swirl. This is two glorious, distinct, perfect layers. It’s a showstopping centerpiece that will have your family and friends absolutely speechless.
The Ultimate Pumpkin Pie Cheesecake Recipe
This, right here, is the pumpkin pie cheesecake recipe that ends all arguments. It’s the peace treaty between two dessert titans.
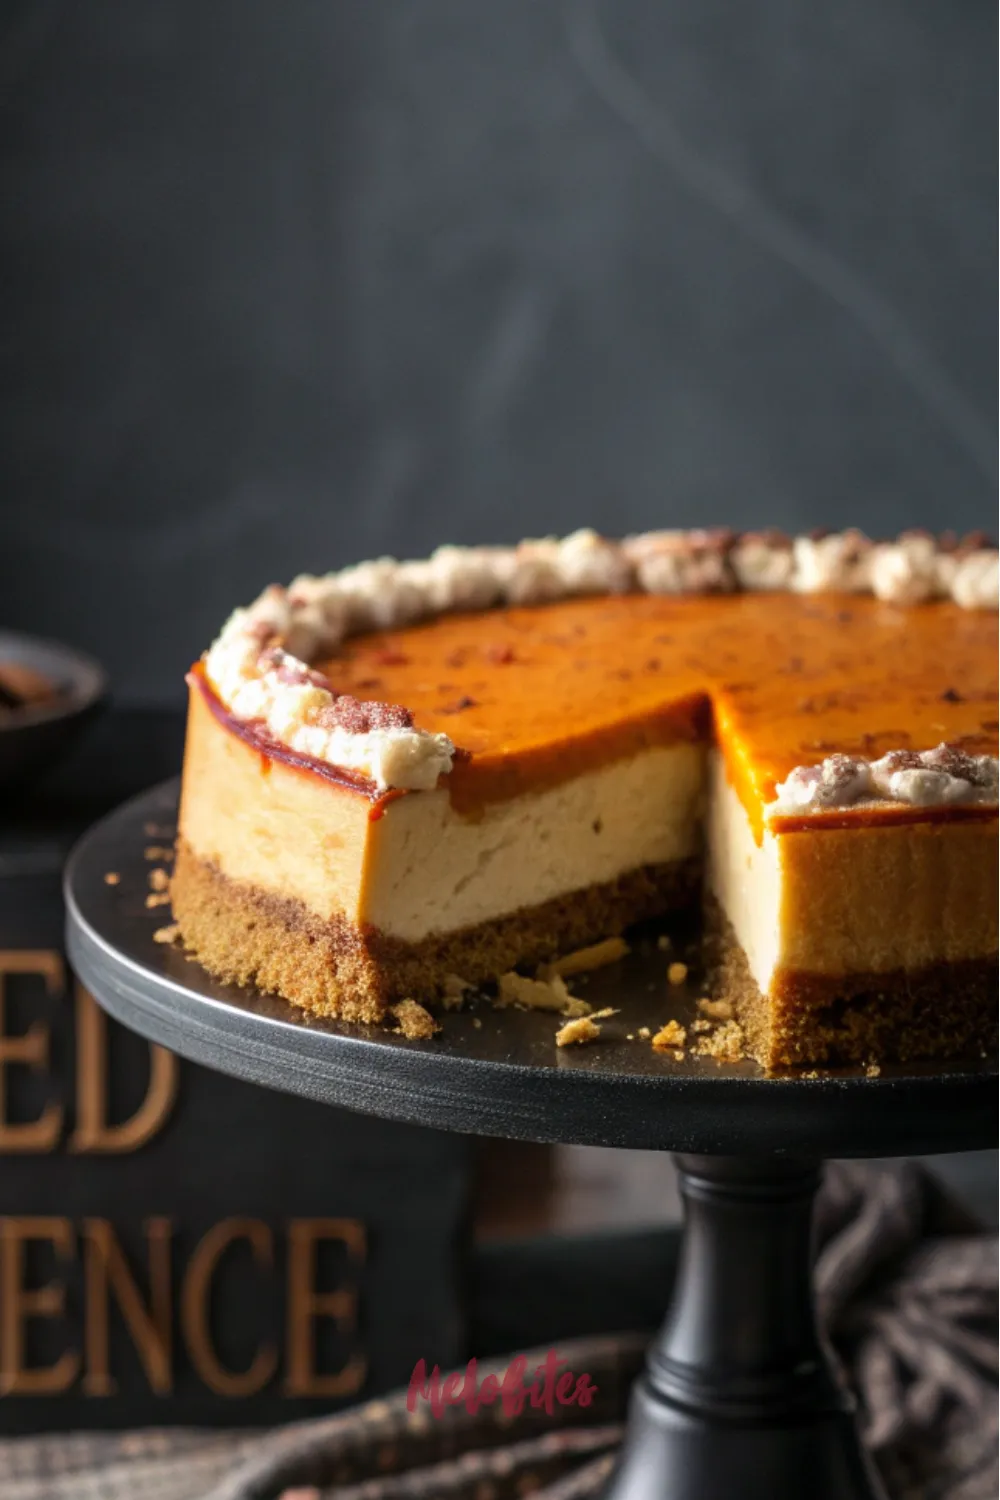
We’re not just mixing pumpkin into a cheesecake batter. We are literally, and I mean literally, layering a perfect, rich, classic cheesecake underneath a perfect, silky, spiced pumpkin pie.
It’s a marvel of dessert engineering. The base is a dense, tangy, New York-style cheesecake. The top is the light, creamy, familiar pumpkin pie you’ve loved your whole life. The two bake together into a single, harmonious masterpiece.
A Layered Pumpkin Cheesecake for Your Thanksgiving Desserts
This is the showstopper. When you bring this layered pumpkin cheesecake to the table, it’s one of those record-scratch moments. It’s so beautiful, with its two distinct layers, that people will think you’re a professional pastry chef.
But here’s the secret: it’s not that hard. If you can make a cheesecake, and you can make a pumpkin pie (which is just “dump and stir”), you can make this.
It immediately takes its crown as the king of all Thanksgiving desserts. It’s got the tradition, but it’s got the “wow” factor. It’s the perfect blend of comfort and pure, decadent indulgence.
Why This is the Best Pumpkin Dessert Mashup Recipe
I’m going to make a bold claim. This is the best pumpkin dessert mashup recipe you will ever try. Why? Because it understands what makes both desserts great.
A pumpkin pie is all about the light, spiced, silky custard. A cheesecake is all about the dense, rich, tangy cream cheese.
A “pumpkin swirl” cheesecake compromises both; the pumpkin gets muted, and the cheesecake gets a little mushy. This layered version lets each element shine. You get the full-on “pumpkin pie” experience and the full-on “cheesecake” experience in every single bite.
Why You’ll Love This Pumpkin Pie Cheesecake
- You Don’t Have to Choose! This is the ultimate answer to holiday indecision. You get both of your favorite desserts in one slice.
- The Texture is Unbelievable: You get the buttery, crunchy graham cracker crust, the rich, dense cheesecake, AND the light, silky pumpkin custard.
- It’s a Showstopper: The two distinct layers look absolutely stunning. It’s the centerpiece your holiday table deserves.
- It’s the Perfect Make-Ahead: Cheesecakes must be made a day in advance. This is not a suggestion; it’s a requirement. This frees up your oven and your sanity on the big day.
Nutritional Benefits
Okay, let’s be real for a second. This is a celebration. This is a magnificent, two-desserts-in-one, holiday-level indulgence. We are not making a kale salad.
But the wonderful thing about a homemade dessert of this caliber is that you’re using real, wholesome ingredients. We’ve got real pumpkin puree, which is packed with fiber and Vitamin A.
We’ve got high-quality cream cheese and eggs, which are loaded with protein and healthy fats. It’s a real dessert, and because it’s so rich, a small, satisfying slice is all you need.
Full Recipe: Pumpkin Pie Cheesecake
Prep Time: 45 minutes Cook Time: 1 hour 30 minutes Oven Cool Time: 1 hour Total Time: 3 hours 15 minutes (plus 6 hours chilling) Yield: 1 (9-inch) cheesecake, 12-16 slices Category: Dessert Method: Baking (Water Bath) Cuisine: American Diet: N/A
Essential Ingredients for this Pumpkin Pie Cheesecake
For the Graham Cracker Crust:
- 1 1/2 cups graham cracker crumbs (about 10-12 full sheets)
- 1/3 cup granulated sugar
- 6 tablespoons unsalted butter, melted
- 1/2 teaspoon ground cinnamon
For the Cheesecake Layer:
- 16 ounces (2 packages) full-fat block cream cheese, softened to room temperature
- 3/4 cup granulated sugar
- 2 large eggs, at room temperature
- 1/2 cup sour cream, at room temperature
- 1 teaspoon vanilla extract
For the Pumpkin Pie Layer:
- 1 can (15 ounces) 100% pure pumpkin puree (NOT pie filling)
- 1/2 cup granulated sugar
- 1/4 cup packed dark brown sugar
- 2 large eggs, at room temperature
- 1/2 cup heavy whipping cream
- 1 1/2 teaspoons pumpkin pie spice (or 1 tsp cinnamon, 1/4 tsp ginger, 1/4 tsp nutmeg)
- 1/2 teaspoon kosher salt
Ingredients Notes
- Cream Cheese: This is non-negotiable. You must use full-fat, block-style cream cheese. Do not use the stuff in a tub; it has too much water and will make your cheesecake soupy. It must be at room temperature.
- Room Temperature Ingredients: I’m saying it again. Your eggs, sour cream, and cream cheese all must be at true room temperature. This is the #1 secret to a smooth, lump-free, crack-free cheesecake.
- Pumpkin Puree: Read the can! Make sure it says “100% Pure Pumpkin” and NOT “Pumpkin Pie Filling.” The pie filling is pre-sweetened and spiced, and it will destroy this recipe.
- Graham Cracker Crumbs: You can buy the pre-made crumbs, or just toss 10-12 graham cracker sheets into a food processor (or a zip-top bag with a rolling pin) and pulse until they’re fine crumbs.
How to Make this Pumpkin Pie Cheesecake, Step-by-Step
- Prep Your Pan and Oven: Preheat your oven to 350°F (175°C). Get a 9-inch springform pan. This is essential for a cheesecake. Wrap the outside of the pan in a large, heavy-duty piece of aluminum foil, making sure to cover the bottom and go all the way up the sides. This is to waterproof it for the water bath.
- Make the Crust: In a medium bowl, combine the graham cracker crumbs, 1/3 cup sugar, and cinnamon. Pour in the melted butter and mix with a fork until the crumbs are all moistened, like wet sand.
- Press and Bake the Crust: Dump the crumbs into your prepared springform pan. Use your fingers and the flat bottom of a glass to press the crumbs firmly into the bottom and about 1 inch up the sides of the pan.
- Par-Bake: Bake the crust for 10 minutes. This makes it crisp. Remove it from the oven and let it cool on a wire rack while you make the layers.
- Make the Cheesecake Layer: In a large bowl (or the bowl of a stand mixer), beat the room temperature cream cheese on medium speed until it’s completely smooth and has no lumps. This is the most important step. Scrape down the bowl.
- Add Sugar and Wet Ingredients: Add the 3/4 cup of granulated sugar and beat until smooth. Add the eggs, one at a time, mixing on low speed just until the yellow disappears. Scrape the bowl. Finally, mix in the sour cream and vanilla on low speed. Do not over-mix!
- Pour Layer One: Pour the cheesecake batter evenly over your cooled, par-baked crust. Set the pan aside.
- Make the Pumpkin Pie Layer: In a separate large bowl, whisk together the pumpkin puree, granulated sugar, brown sugar, eggs, heavy cream, pumpkin pie spice, and salt. Whisk until it’s all smooth and combined.
- Pour Layer Two: This is the magic trick. To keep the layers separate, gently pour the pumpkin pie mixture over the back of a large spoon, moving it around so the pumpkin filling floats on top of the unbaked cheesecake layer. It will look perfect.
- Prepare the Water Bath: Place your foil-wrapped springform pan into a large roasting pan. Get a kettle of very hot (or boiling) water. Carefully pour the hot water into the roasting pan until it comes about 1 to 1.5 inches up the outside of your springform pan.
- Bake the Cheesecake: Carefully transfer the whole roasting-pan setup into the preheated 350°F oven. Bake for 75-90 minutes (1 hour 15 min to 1 hour 30 min).
- Check for Doneness: The cheesecake is done when the edges are set and puffed, but the center (about a 3-inch circle) still has a slight, Jell-O-like wobble. Do not over-bake!
- The Slow Cool-Down (CRITICAL): Turn off the oven. Crack the oven door open with a wooden spoon. Let the cheesecake cool in the turned-off, propped-open oven for 1 full hour.
- Cool at Room Temp: Carefully remove the springform pan from the water bath (remove the foil!). Let it cool on a wire rack at room temperature for another 1-2 hours, until it’s no longer warm.
- The Final Chill: Cover the (now cool) cheesecake loosely with plastic wrap. Transfer it to the refrigerator to chill for at least 6 hours, but preferably overnight. Do not skip this step!
Alternative Recipe: The No-Bake Layered Pumpkin Cheesecake
Look, I get it. Water baths and 90-minute bakes are a lot for a busy holiday. If you want the same flavor profile with about 80% less stress, a no-bake version is your best friend.
This version sets up in the fridge with gelatin and whipped cream.
No-Bake Ingredients:
- 1 pre-made 9-inch graham cracker crust
- Cheesecake Layer:
- 1 package (8 ounces) cream cheese, softened
- 3/4 cup powdered sugar
- 1 teaspoon vanilla extract
- 1 cup cold heavy whipping cream
- Pumpkin Layer:
- 1 can (15 ounces) pure pumpkin puree
- 1/2 cup brown sugar
- 1 1/2 teaspoons pumpkin pie spice
- 1 envelope (1/4 oz) unflavored gelatin
- 1/4 cup cold water
- 1 cup cold heavy whipping cream
Instructions for the No-Bake Version:
- Make the Cheesecake Layer: In a large bowl, beat the cream cheese, powdered sugar, and vanilla until smooth.
- Whip and Fold: In a separate bowl, beat 1 cup of heavy cream to stiff peaks. Gently fold the whipped cream into the cream cheese mixture. Spread this layer evenly into the bottom of your graham cracker crust. Chill in the fridge while you make the next layer.
- Make the Pumpkin Layer: In a saucepan, combine the pumpkin, brown sugar, and spices. Cook over medium heat for 5 minutes until hot.
- Bloom Gelatin: While it heats, sprinkle the gelatin over the 1/4 cup of cold water in a small bowl. Let it sit for 5 minutes.
- Melt Gelatin: Add the jiggly gelatin mixture to the hot pumpkin and stir until it completely dissolves. Let this cool to room temperature.
- Whip and Fold Again: In a separate bowl, beat the other 1 cup of heavy cream to stiff peaks. Gently fold this whipped cream into the cooled pumpkin mixture.
- Layer and Chill: Gently spread the pumpkin mousse layer on top of the chilled cheesecake layer.
- Chill Completely: Refrigerate for at least 6 hours, or overnight, until completely firm.
Storage Options
This cheesecake is your friend in the fridge. It must be stored, covered, in the refrigerator.
Once it’s completely chilled (after that initial 6+ hours), you can cover it with plastic wrap. It will keep beautifully for up to 5 days. In fact, the flavor is arguably better on day two, as the spices meld.
This pie also freezes like an absolute dream. You can freeze the whole cheesecake or individual slices. Let it chill completely, then freeze it “naked” on a baking sheet for 2-3 hours until solid. Once frozen, wrap it tightly in plastic wrap and then a layer of aluminum foil. It will keep for up to 2 months. To thaw, just place it (unwrapped) in the refrigerator overnight.
Variations and Substitutions
This recipe is a fantastic starting point. Here are a few ways to make it your own.
- Crust Swap: This is the easiest change. Use a gingersnap crust for a spicy kick or a chocolate/Oreo crust for a super-decadent version.
- Make it a Swirl: If you don’t want layers, just make the two batters as written. Dollop them into the par-baked crust, alternating (cheesecake, pumpkin, cheesecake…). Then, take a knife and run it through the batter in an “S” shape, turn the pan, and repeat. Do this only 3-4 times. Don’t over-mix!
- Make it Boozy: Add 2 tablespoons of bourbon or dark rum to the pumpkin pie layer when you add the cream. It adds an incredible warmth.
- Gluten-Free: This is an easy fix. Just use your favorite gluten-free graham crackers to make the crust. The filling is already naturally gluten-free.
Practical & Valuable Tips
Tip 1: Room Temp, Room Temp, Room Temp! I’m saying this a third time because it is the #1 rule of cheesecake. Your cream cheese, eggs, and sour cream must be at room temperature. Cold cream cheese will give you a lumpy, chunky cheesecake. No one wants that.
Tip 2: The Water Bath is Not Optional. I know, it sounds fussy. But it is the one-and-only insurance policy for a perfect cheesecake. The steam from the water creates a humid environment in your oven, which bakes the custard gently and prevents it from drying out, puffing up, and cracking.
Tip 3: Do Not Over-Mix Your Eggs! This is the #2 cause of cracks. Once you add your eggs, mix on low speed and stop the second they are incorporated. Beating air into your eggs makes the cheesecake puff up like a soufflé… and then dramatically crack and sink as it cools.
Tip 4: The Slow Cool-Down is Your Secret Weapon. This is the #3 cause of cracks. A sudden temperature change (from a hot oven to a cool kitchen) will shock the custard and make it split. The 1-hour in the turned-off oven, followed by the 1-hour on the counter, is a non-negotiable process for a flawless top.
Frequently Asked Questions
- My cheesecake cracked! What did I do wrong? It was one of three things (or all three): 1) Your ingredients were too cold, and you got lumps. 2) You over-mixed the eggs. 3) You didn’t use a water bath, or you cooled it down too fast. Don’t worry, it still tastes amazing! Just cover it with whipped cream.
- How do I get the pumpkin layer to float? The unbaked cheesecake batter is very dense, and the pumpkin pie batter is slightly thinner. As long as you pour the pumpkin mixture gently (over the back of a spoon is the best trick), it will naturally float on top.
- Can I use pumpkin pie filling from a can? NO. Absolutely not. Please don’t. That can is already full of sugar, spices, and thickeners. This recipe is designed for “100% Pure Pumpkin” puree. Using the filling will make your pie disgustingly sweet and the texture will be a disaster.
- Do I really have to chill it for 6 hours? Yes. I’m serious. A cheesecake is not truly “done” when it comes out of the oven. The chilling process is the final stage of “cooking,” where the custard sets up into that dense, creamy, sliceable texture.
- Can I make this in a regular pie plate? I would strongly advise against it. You need the tall, straight sides and the removable ring of a springform pan to contain the two layers and to get it out cleanly. A regular pie plate is too shallow and you’ll have a terrible time trying to serve it.
So, this holiday, stop the debate. Stop the choosing.
Make the one dessert that does it all. This Pumpkin Pie Cheesecake recipe is the showstopper you’ve been looking for, and it’s the perfect, creamy, delicious answer to the toughest holiday question.
If you make this glorious mashup, I need to hear about it! And please, snap a picture and save this recipe to your “Thanksgiving Desserts” or “Holiday Baking” board on Pinterest. It’s too good to keep to yourself!


Leave a Comment