
Hello, my friends! Let’s talk about pumpkin pie.
We all know it, we all love it, and we all have that iconic orange can of pumpkin puree sitting in our pantry. It’s a staple, a tradition, a reliable friend. But I have to ask you a question: have you ever really tasted pumpkin pie?
I mean, have you ever tasted a pie made from a real pumpkin, one that you roasted yourself? A pie where the pumpkin flavor isn’t just a flat, one-note background for the spices, but a sweet, nutty, and complex flavor all on its own?
What if I told you that the pie you’ve been making is like a black-and-white photo, and the from-scratch version is in full, vibrant 4K color?
This, right here, is the ultimate pumpkin pie recipe from scratch. It is a labor of love. It’s a full-on, weekend baking project that will fill your home with the most incredible smells. It’s the pie that will make you, and everyone you serve it to, realize what pumpkin pie was always meant to be.
What Makes This Pumpkin Pie Recipe from Scratch a True Project?
This isn’t a “quick and easy” recipe, and I’m not going to pretend it is. This is a real pumpkin pie recipe from scratch, and that means we are doing it all. We are not cutting corners.
We are making our own flaky, all-butter pie crust by hand. We are selecting, roasting, and pureeing a fresh pumpkin. We are creating a dessert from its core components, and the payoff is absolutely massive.
This is the pie you make when you want to really bake. It’s the pie you make to show off. It’s the pie that will become the single most-requested, most-talked-about dessert on your holiday table, guaranteed.
The Magic of Homemade Pumpkin Puree (It’s a Game Changer)
Let’s talk about the heart of this pie: the homemade pumpkin puree. This is the one step that changes everything. Canned pumpkin is convenient, but it’s been steamed and processed, and it tastes flat.
Roasting a fresh pumpkin is a totally different ballgame. The dry heat of the oven caramelizes the pumpkin’s natural sugars. The flavor becomes deep, nutty, and intensely sweet. It’s the difference between a fresh, juicy peach you pick from a tree and a peach from a can. Both are fine, but they aren’t in the same league.
This is the secret that elevates all homemade pie recipes. When your core ingredient is this good, the final product is destined to be legendary. You’ll never look at that can the same way again.
How to Make a Pumpkin Pie with Fresh Pumpkin (The Easy Way)
I know the idea of how to make a pumpkin pie with fresh pumpkin sounds intimidating. It sounds like something our great-grandmothers did because they had to.
But the process is actually incredibly simple. It’s just two main parts that you can do on different days.
Part 1: You make the puree. You just cut a pumpkin in half, scoop the seeds, and roast it. That’s it. Scrape out the flesh, whiz it in a food processor, and you’re done.
Part 2: You make the pie. You use your amazing, fresh puree just like you would the canned stuff. It’s an extra step, but it’s a worthwhile step, and I promise, you can absolutely do this.
Why You’ll Love This From-Scratch Pie
- The Flavor is Insane: This is the big one. It tastes like pumpkin, not just like “pumpkin spice.” It’s sweet, nutty, and complex.
- The Pride is Real: When you put this pie on the table and say, “I made this, even the puree, from a real pumpkin,” you will feel like a baking superhero.
- The Texture is Better: Fresh puree, when you drain it properly (we’ll get to that!), creates a custard that is silkier and more velvety than anything from a can.
- You Control Everything: You control the sugar, the spices, and the salt. There are no preservatives, no “canned” taste, just pure, real food.
Nutritional Benefits
This is a celebration pie, so we’re not counting calories! But there is a huge, wholesome benefit to making it from scratch.
When you use a fresh pie pumpkin, you are getting pure, unadulterated, real food. That pumpkin is a nutritional powerhouse, loaded with Vitamin A, fiber, and potassium.
By making your own, you’re also skipping the BPA from can liners and any potential preservatives. And by making your own crust, you’re using real butter, not the processed hydrogenated fats you might find in a store-bought shell. It’s a “cleaner,” more wholesome dessert, from the ground up.
Full Recipe: The Ultimate Pumpkin Pie from Scratch
Prep Time: 1 hour 30 minutes (includes making puree and dough) Cook Time: 1 hour 35 minutes (includes roasting pumpkin and baking pie) Chill Time: 4 hours Total Time: 7 hours 40 minutes (can be split over 2 days) Yield: 1 (9-inch) deep-dish pie, 8 slices Category: Dessert Method: Roasting, Baking Cuisine: American Diet: N/A
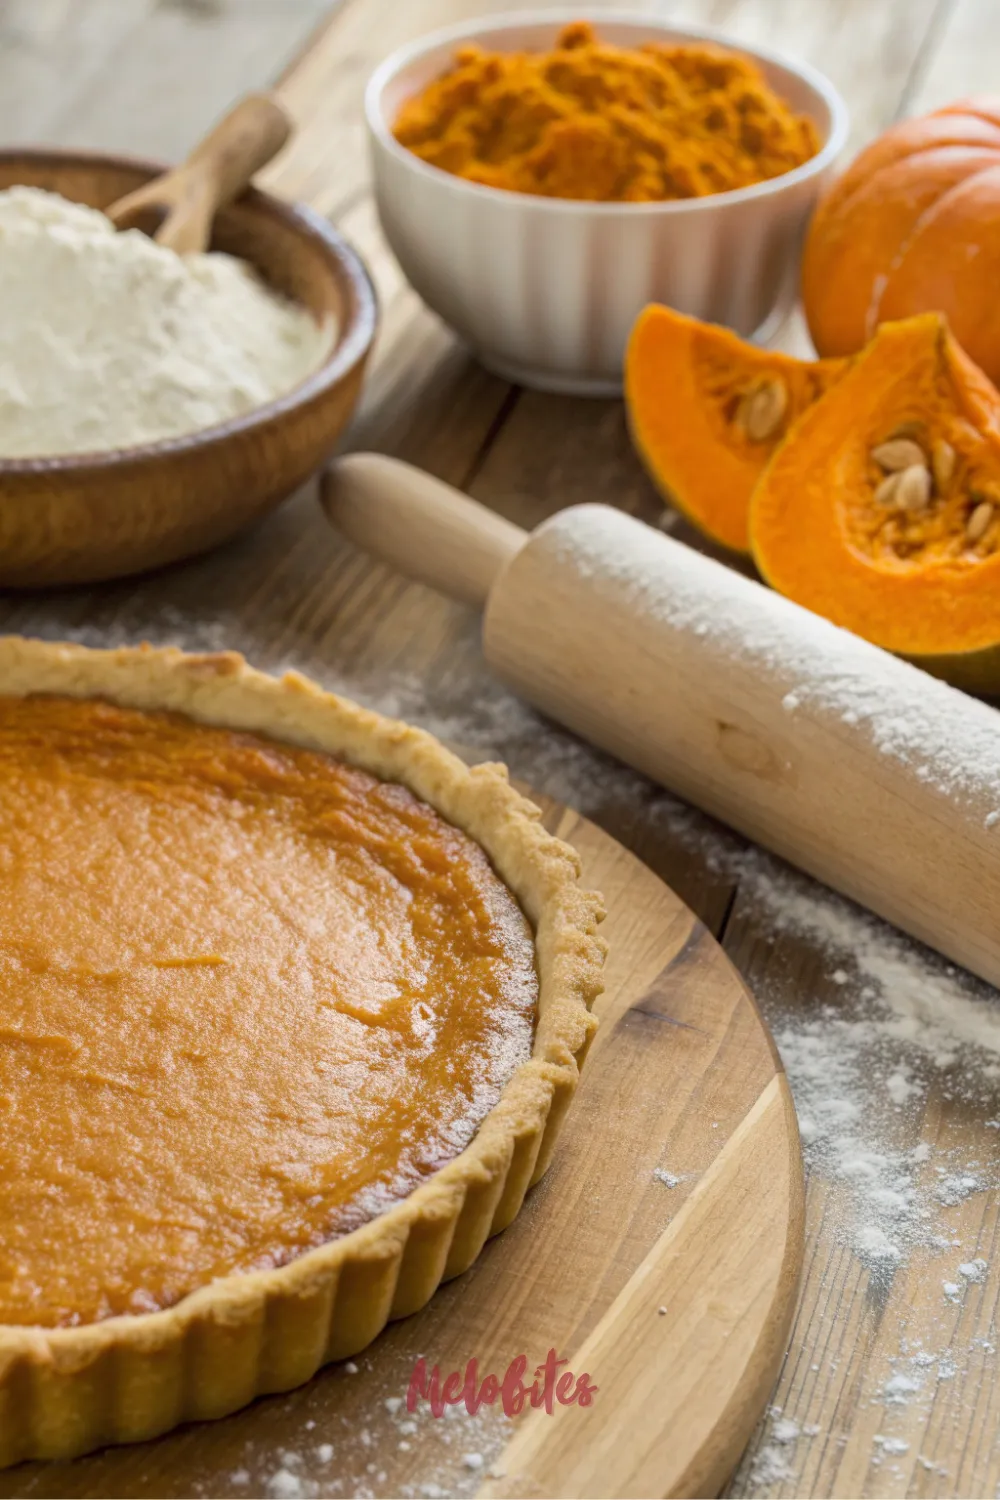
Essential Ingredients for this Pumpkin Pie from Scratch
For the Homemade Pumpkin Puree:
- 1 (4 to 5 pound) sugar pie pumpkin (or 2 small ones)
For the All-Butter Flaky Pie Crust:
- 1 1/4 cups all-purpose flour
- 1/2 teaspoon kosher salt
- 1 tablespoon granulated sugar
- 1/2 cup (1 stick) very cold unsalted butter, cut into 1/4-inch cubes
- 3-5 tablespoons ice-cold water
For the Silky Pumpkin Filling:
- 2 cups (about 16 ounces) homemade pumpkin puree, well-drained
- 1 can (12 ounces) evaporated milk
- 3/4 cup packed dark brown sugar
- 3 large eggs
- 1 1/2 teaspoons ground cinnamon
- 1 teaspoon ground ginger
- 1/2 teaspoon ground nutmeg
- 1/2 teaspoon kosher salt
- 1 teaspoon vanilla extract
Ingredients Notes
- THE PUMPKIN: This is the most important part. You cannot use a large Halloween carving pumpkin. They are watery, stringy, and have no flavor. You MUST buy a small pumpkin labeled “Sugar Pie,” “Pie Pumpkin,” or “New England Pie Pumpkin.”
- Cold Butter: For the crust, your butter must be ice cold. This is the secret to a flaky crust. The little butter pockets will melt in the oven, create steam, and separate the dough into layers.
- Ice Water: Same as the butter. Your water must be ice-cold. I put ice cubes in a cup of water and measure from there.
- Evaporated Milk: This is the classic, and I stand by it. It gives the pie a rich, creamy, traditional flavor. You can substitute heavy cream if you prefer.
- Brown Sugar: I love dark brown sugar for this pie. The deep molasses flavor pairs beautifully with the nutty, roasted pumpkin.
How to Make This Pumpkin Pie Recipe from Scratch (Detailed)
This recipe is in three main parts. You can (and should) make the puree and the pie dough a day in advance!
Part 1: Make Your Homemade Pumpkin Puree
- Prep and Roast: Preheat your oven to 400°F (200°C). Line a large baking sheet with parchment paper. Carefully cut your sugar pie pumpkin in half from stem to bottom.
- Scoop the Seeds: Use a strong metal spoon to scoop out all the seeds and stringy bits. (You can save the seeds and roast them later for a snack!)
- Roast the Pumpkin: Place the two pumpkin halves, cut-side down, on the parchment-lined baking sheet. Roast for 40-50 minutes, or until the skin is dark and a fork pierces the flesh with zero resistance.
- Cool and Scrape: Let the pumpkin halves cool on the baking sheet until you can safely handle them (about 20-30 minutes). Use a large spoon to scrape all the soft, cooked flesh away from the skin.
- Puree: Transfer the pumpkin flesh to a food processor or a high-speed blender. Blend until the puree is 100% smooth and silky. A 4-5 lb pumpkin should yield about 3-4 cups of puree.
- DRAIN THE PUREE (CRITICAL STEP): Fresh pumpkin puree is much wetter than canned. Set a fine-mesh sieve over a large bowl and line it with a layer of cheesecloth (or a clean, thin kitchen towel).
- Chill and Drain: Dump your puree into the lined sieve, cover it, and place the whole setup in the refrigerator for at least 4 hours, or preferably overnight. You’ll be shocked at how much watery liquid drains out. This is the secret to a firm, not-soupy, pie.
- Note: After draining, you’ll need 2 cups of the thick, drained puree for this recipe.
Part 2: Make Your All-Butter Pie Crust
- Mix Dry Goods: In a large, cold bowl, whisk together the flour, salt, and sugar.
- Cut in Butter: Add your cold butter cubes to the flour. Use your fingers or a pastry cutter to quickly rub the butter into the flour. You want to “smush” the butter into flat, pea-sized and shingle-sized pieces. Stop when the mixture looks like coarse, shaggy crumbs.
- Add Water: Drizzle 3 tablespoons of ice-cold water over the mixture. Use a fork (or your hands) to toss the dough together. It should just start to clump. If it’s too dry, add more water, 1 teaspoon at a time.
- Form and Chill: Dump the shaggy dough onto a piece of plastic wrap. Use the wrap to press the dough into a 1-inch thick disk. Do not knead it! Wrap it tightly and chill in the fridge for at least 1 hour, or up to 2 days.
Part 3: Assemble and Bake Your Pie
- Prep Oven and Crust: When you’re ready to bake, preheat your oven to 400°F (200°C). On a lightly floured surface, roll your chilled dough into a 12-inch circle. Gently transfer it to a 9-inch deep-dish pie plate. Tuck the edges under and crimp them.
- Freeze and Blind Bake: Freeze the unbaked shell for 15 minutes. Line the frozen shell with parchment paper and fill it to the top with pie weights or dried beans.
- Bake the Crust: Bake at 400°F for 15-20 minutes. The edges should be set. Carefully remove the parchment and weights.
- Finish the Blind Bake: Use a fork to poke a few small holes in the bottom of the crust. Bake the empty shell for another 7-10 minutes, until the bottom is dry and the edges are a light golden brown.
- Cool and Lower Temp: Set the par-baked crust aside on a wire rack. Reduce the oven temperature to 350°F (175°C).
- Make the Filling: This is the easy part! In a large bowl, whisk together your 2 cups of well-drained homemade pumpkin puree, the evaporated milk, dark brown sugar, and the 3 lightly beaten eggs.
- Add Spices: Whisk in the cinnamon, ginger, nutmeg, salt, and vanilla until the filling is perfectly smooth, silky, and uniform in color.
- Fill and Bake: Place your par-baked pie shell on a baking sheet. Pour the filling into the crust.
- Bake the Pie: Bake at 350°F for 50-60 minutes.
- The “Jiggle Test”: The pie is done when the edges are set and puffed. The very center (about a 2-3 inch circle) should still have a slight wobble. It should wobble like Jell-O, not slosh like water.
- Cool Completely (MANDATORY): This is the hardest part. You must let the pie cool on a wire rack at room temperature for at least 3-4 hours. Do not slice it warm! The custard needs this time to cool and set up into that perfect, sliceable texture.
Alternative Recipe: The “Gourmet” Brown Butter and Sage Fresh Pumpkin Pie
You’ve already gone to the trouble of making fresh puree, so why not take it one step further? This variation adds a nutty, savory, and sophisticated twist that is absolutely mind-blowing.
Alternative Filling Ingredients:
- 6 tablespoons unsalted butter
- 4-5 fresh sage leaves
- All the other ingredients for the filling (2 cups puree, evaporated milk, sugar, eggs, spices, etc.)
How to Make the Alternative Version:
- Blind Bake Your Crust: Follow all the steps to prepare your par-baked crust.
- Brown the Butter: In a small, light-colored saucepan, melt the 6 tablespoons of butter over medium heat. Add the fresh sage leaves.
- Infuse the Butter: Let the butter melt, then sizzle, and foam. Keep swirling the pan. After 5-8 minutes, the sizzling will quiet down, the sage leaves will be crisp, and you’ll see golden-brown solids at the bottom. It will smell incredibly nutty.
- Cool: Immediately remove from the heat. Discard the crispy sage leaves (or crumble them into the filling!). Let the brown butter cool for 10-15 minutes.
- Make the Filling: In your large bowl, whisk together all the standard filling ingredients (pumpkin, milk, sugar, eggs, spices).
- Add the Magic: Drizzle in the cooled brown butter and whisk until it’s fully incorporated.
- Bake: Pour this filling into your par-baked crust and bake at 350°F for 50-60 minutes, just like the main recipe. The brown butter adds an insane depth and richness.
Storage Options
This is a custard pie, which means it must be stored in the refrigerator.
Once the pie has cooled completely (and I mean 100% to room temperature), cover it loosely with plastic wrap or aluminum foil. It will keep beautifully in the fridge for 4 to 5 days.
I’m just going to say it: the flavor is even better on day two. The spices get to meld, and the fresh pumpkin flavor deepens.
This pie also freezes like a dream. You can freeze the whole pie or individual slices. Let it chill completely, then freeze it “naked” (uncovered) on a baking sheet until solid. Once solid, wrap it tightly in two layers of plastic wrap, then a layer of aluminum foil. It will keep for up to 2 months. To thaw, just unwrap it and place it in the refrigerator overnight.
Variations and Substitutions
This recipe is a fantastic baseline, but you can absolutely play with it.
- Sweetener Swap: If you prefer, you can use 1/2 cup of pure maple syrup and 1/4 cup of granulated sugar instead of the brown sugar. The maple pairs beautifully with the roasted pumpkin.
- Dairy-Free: You can make this dairy-free! Use a can of full-fat coconut milk (the whole can) in place of the evaporated milk. For the crust, use a high-quality, stick-form vegan butter (cold!) or cold, solid coconut oil.
- Spice it Up: You’ve made your own puree, so control the spice! Add 1/4 teaspoon of ground cardamom or a tiny pinch of black pepper for a modern, sophisticated kick.
- The Crust: If making a homemade crust is just one step too far, that’s okay! Buy a high-quality, store-bought, unbaked pie shell. The fresh puree is the biggest flavor upgrade, so you’ll still be miles ahead.
Practical & Valuable Tips
Tip 1: The Draining Step is NOT Optional. I’m saying this a final time. It is the #1 most important tip for this recipe. If you use your fresh, watery puree directly from the food processor, you will have pumpkin soup in a crust. You must drain it, preferably overnight.
Tip 2: The “Stovetop” Drain Method (The Fast Way). Don’t have 4 hours? Here’s the cheat. Put your 2 cups of fresh puree in a wide, non-stick saucepan over medium-low heat. Cook, stirring constantly, for 10-15 minutes. The water will visibly steam off, and the puree will thicken and darken. Let it cool before using.
Tip 3: The Pie Shield is Your Best Friend. This pie bakes for a long time. The exposed edges of your crust will go from “golden” to “black” very quickly. After the first 25-30 minutes of the 350°F bake, check the crust. If it’s perfectly golden, make a “pie shield.” Just cut a large ring out of aluminum foil and gently lay it over the edges of the pie, leaving the center exposed to finish cooking.
Tip 4: The “Jiggle Test” is Key. The biggest mistake is over-baking. A custard pie continues to cook from residual heat. You want to take it out when the center still has a slight wobble (like Jell-O). If it’s rock-solid, it’s overdone, and the texture will be rubbery and it will crack.
Frequently Asked Questions
- Can I really not use a regular carving pumpkin? I am begging you, please do not. They are 90% water and 10% stringy, flavorless pulp. You will do all this work and be so disappointed. You must use a small “Sugar Pie Pumpkin.”
- My “from-scratch” pie was watery and soupy! What happened? You didn’t drain your puree. I promise you, this is the reason. You must, must, must get that excess water out before you make your filling. (See Tip #1 and #2).
- Can I make the puree and pie crust ahead of time? You absolutely should! I always do. You can make the puree and store it in an airtight container in the fridge for up to 4 days. You can make the pie dough, wrap it in a disk, and it will keep in the fridge for 2 days or in the freezer for 3 months.
- Why did my pie crack? This is the most common pie problem! It’s almost always one of two things: you over-baked it (see Tip #4) or you cooled it too quickly. Don’t take a hot pie and stick it in a cold fridge. Let it cool completely at room temperature.
- Is all this work really worth it? One hundred percent, yes. It’s not just a pie; it’s an experience. The flavor is so much better, so much realer, that it will spoil you forever. It’s a special occasion pie, and it’s worth every single second.
So there you have it. This is the ultimate Pumpkin Pie Recipe from Scratch.
It’s the project pie that separates the bakers from the assemblers. It’s the homemade pumpkin pie that will redefine the flavor of the holiday for you.
If you’re ready to taste real pumpkin pie, I hope you’ll give this a try. Be sure to save this guide and pin it to your “Holiday Baking” or “From Scratch Recipes” board on Pinterest. You’re going to want to find this one when you’re ready to win Thanksgiving. Happy baking!


Leave a Comment