Let’s talk about that bottle of teriyaki sauce in your fridge. You know the one. It’s thick, gloopy, and has an ingredient list a mile long.
We buy it thinking it’s a shortcut, but it’s a shortcut to a meal that tastes… well, bottled. It’s often overly sweet, loaded with corn syrup and preservatives, and just a shadow of the real thing. What if I told you that real, authentic, restaurant-quality teriyaki sauce has just four main ingredients?
It’s true. And what if I told you that you could make a teriyaki chicken dinner from scratch, in one pan, in about 20 minutes? This is that recipe.
This is the one that will make you look at that old bottle and never, ever buy it again. It’s the perfect balance of sweet and savory, with a glossy, beautiful glaze that you made yourself. It’s fast, it’s fresh, and it’s about to become your new weeknight superstar.
The Perfect 30-Minute Teriyaki Chicken Recipe
This is, without a doubt, the most reliable Teriyaki Chicken Recipe you will ever make. The word “teriyaki” itself tells you the whole story. “Teri” means to shine or glisten, and “yaki” means to grill or broil.
We’re creating a glaze, not a sauce. It’s designed to coat the chicken in a shiny, sweet, and savory layer of pure flavor. This recipe isn’t a thick, heavy, cornstarch-laden mess; it’s light, authentic, and incredibly delicious.
We’re using boneless, skinless chicken thighs, which are the secret to a juicy, tender, and foolproof dish. They are more flavorful than breasts and are almost impossible to overcook. They soak up the glossy sauce and stay perfectly tender, every single time.
Why This Homemade Teriyaki Chicken is a Quick Weeknight Meal
This is the very definition of a quick weeknight meal. We’re talking 20 to 25 minutes, start to finish. That’s less time than it takes to decide on a takeout order, call it in, and wait for it to arrive.
The magic of this homemade teriyaki chicken is its simplicity. While the chicken is browning in the pan, you whisk together your 4-ingredient sauce in a small bowl. It all comes together in one skillet, which means your cleanup is practically non-existent.
An Easy Teriyaki Chicken Recipe for Kids (That They’ll Actually Eat)
If you have picky eaters, this meal is a game-changer. It’s the ultimate easy teriyaki chicken recipe for kids. Why? It hits all the notes that kids instinctively love.
It’s a little sweet, it’s savory (but not spicy!), and it’s “sticky.” The chicken is tender, and the glossy sauce makes it fun to eat. It’s a fantastic way to serve a high-protein dinner that the entire family will genuinely request again and again.
You’ll Adore This Recipe, Here’s Why
I know this is a strong claim, but you’re going to fall in love with this method. First, it’s a true “pantry” recipe. The sauce is made from four ingredients that you can keep on your shelf for months: soy sauce, mirin, sake, and sugar.
Second, the flavor payoff is just massive for the tiny amount of effort. It tastes like a “special occasion” meal. But it’s built for a Tuesday night.
Finally, it’s a “one-pan wonder.” You cook the chicken, you add the aromatics, and you make the sauce, all in the exact same skillet. That’s it. One pan to wash.
The “Feel-Good” File: A Healthy Choice
When you make this from scratch, you are in 100% control of the ingredients. This is a huge win. You get to skip the high-fructose corn syrup, the modified food starch, and the unpronounceable preservatives found in bottled sauces.
You can control the sugar and the sodium. It’s also packed with lean protein from the chicken. It’s a meal that satisfies your cravings and makes you feel good about what you’re eating.
The Main Event: Full Teriyaki Chicken Recipe
Prep Time: 10 minutes | Cook Time: 15 minutes | Total Time: 25 minutes | Yield: 4 servings | Category: Main Course, Dinner | Method: Sautéing, Simmering | Cuisine: Japanese-American | Diet: Dairy-Free
The “Four Pillars”: Essential Teriyaki Ingredients
For the Teriyaki Sauce (whisk this together first!):
- 1/2 cup low-sodium soy sauce (or Tamari for gluten-free)
- 1/2 cup mirin (Japanese sweet rice wine)
- 1/4 cup sake (Japanese rice wine)
- 2 tablespoons granulated sugar (or brown sugar)
For the Chicken:
- 2 lbs boneless, skinless chicken thighs, cut into 1-inch pieces
- 1 tablespoon neutral oil (like avocado, canola, or vegetable oil)
- 1 tablespoon fresh ginger, grated (about a 1-inch knob)
- 3 cloves garlic, minced
- For Garnish (Optional):
- 1 teaspoon toasted sesame oil
- Toasted sesame seeds
- Sliced green onions
A Few Quick Notes on the Roster
- Chicken Thighs: I’m begging you, use thighs. They have more flavor, stay incredibly juicy, and are the traditional choice. You can use chicken breasts, but you must be careful not to overcook them.
- Soy Sauce: Use a low-sodium Japanese soy sauce (like Kikkoman) for the best, most balanced flavor. Tamari or coconut aminos are perfect gluten-free swaps.
- Mirin: This is the secret ingredient. It’s a sweet Japanese rice wine that gives the sauce its body and signature gloss. It is not the same as rice vinegar.
- Sake: This is a dry Japanese rice wine that adds depth and authentic umami. If you absolutely cannot find it or prefer not to use alcohol, you can substitute it with more low-sodium chicken broth.
- Sugar: This is all about balance. I find 2 tablespoons is perfect, but if you like a sweeter, more “American-style” teriyaki, you can increase this to 3 or 4 tablespoons.
Step-by-Step: How to Make Teriyaki Chicken
- Mix the Magic Sauce:
- In a small bowl or a 2-cup liquid measuring cup, combine the soy sauce, mirin, sake, and sugar.
- Whisk well until the sugar is mostly dissolved.
- Set this sauce mixture aside, right next to your stove.
- Prep the Chicken:
- Cut your chicken thighs into uniform, 1-inch bite-sized pieces.
- Pat them thoroughly dry with paper towels.
- A dry chicken is a happy chicken; this is how you get a good, golden-brown sear.
- Get the Pan HOT:
- Place a large, non-stick skillet (or a well-seasoned cast-iron pan) over medium-high heat.
- Add your 1 tablespoon of neutral oil.
- Let the pan get hot. You should hear a sizzle when the chicken hits.
- Cook the Chicken (In Batches!):
- Add half of your chicken pieces to the hot pan in a single, un-crowded layer.
- Do not crowd the pan! This is the most important rule.
- If you crowd the pan, the chicken will steam and turn gray. We want it to sear.
- Let the chicken cook, undisturbed, for 3-4 minutes to get a deep golden-brown crust.
- Flip the pieces and cook for another 3-4 minutes until cooked through.
- Use a slotted spoon to remove the first batch of chicken and set it on a clean plate.
- Repeat the process with the second batch of chicken.
- Cook the Aromatics:
- Once all the chicken is cooked and removed, turn the heat down to medium.
- Add your minced garlic and grated ginger to the empty pan.
- Stir constantly for 30-60 seconds, just until you can smell them. Do not let them burn.
- Make the Glaze:
- Pour your pre-mixed teriyaki sauce into the hot pan.
- It will bubble up aggressively.
- Use your whisk or wooden spoon to scrape up all those delicious, browned bits of chicken stuck to the bottom of the pan (this is called fond, and it’s pure flavor).
- Simmer and Thicken:
- Let the sauce come to a strong, rolling simmer.
- Allow it to bubble and reduce for 3-5 minutes.
- The sauce will thicken, and the alcohol from the sake will cook off.
- It will become glossy and syrupy, thick enough to coat the back of a spoon.
- The Grand Finale:
- Turn the heat down to low.
- Add all of your cooked chicken (and any juices from the plate) back into the pan.
- Toss the chicken in the beautiful, thick glaze until every single piece is coated.
- This should only take about 1-2 minutes.
- Serve Immediately:
- Turn off the heat.
- Stir in the 1 teaspoon of toasted sesame oil (if using).
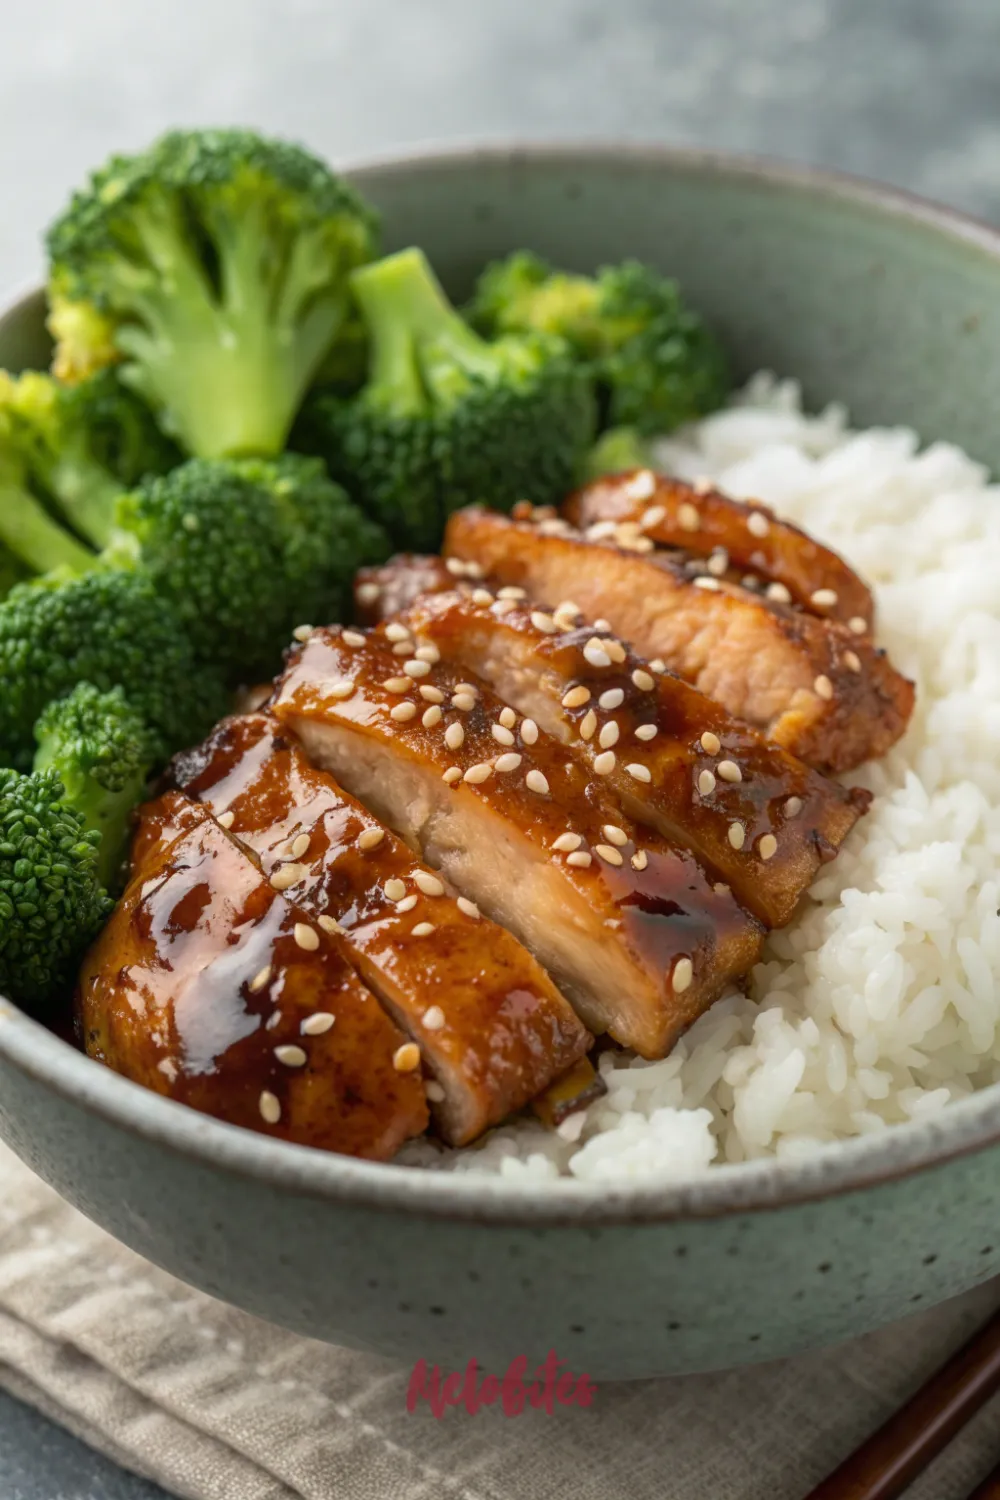
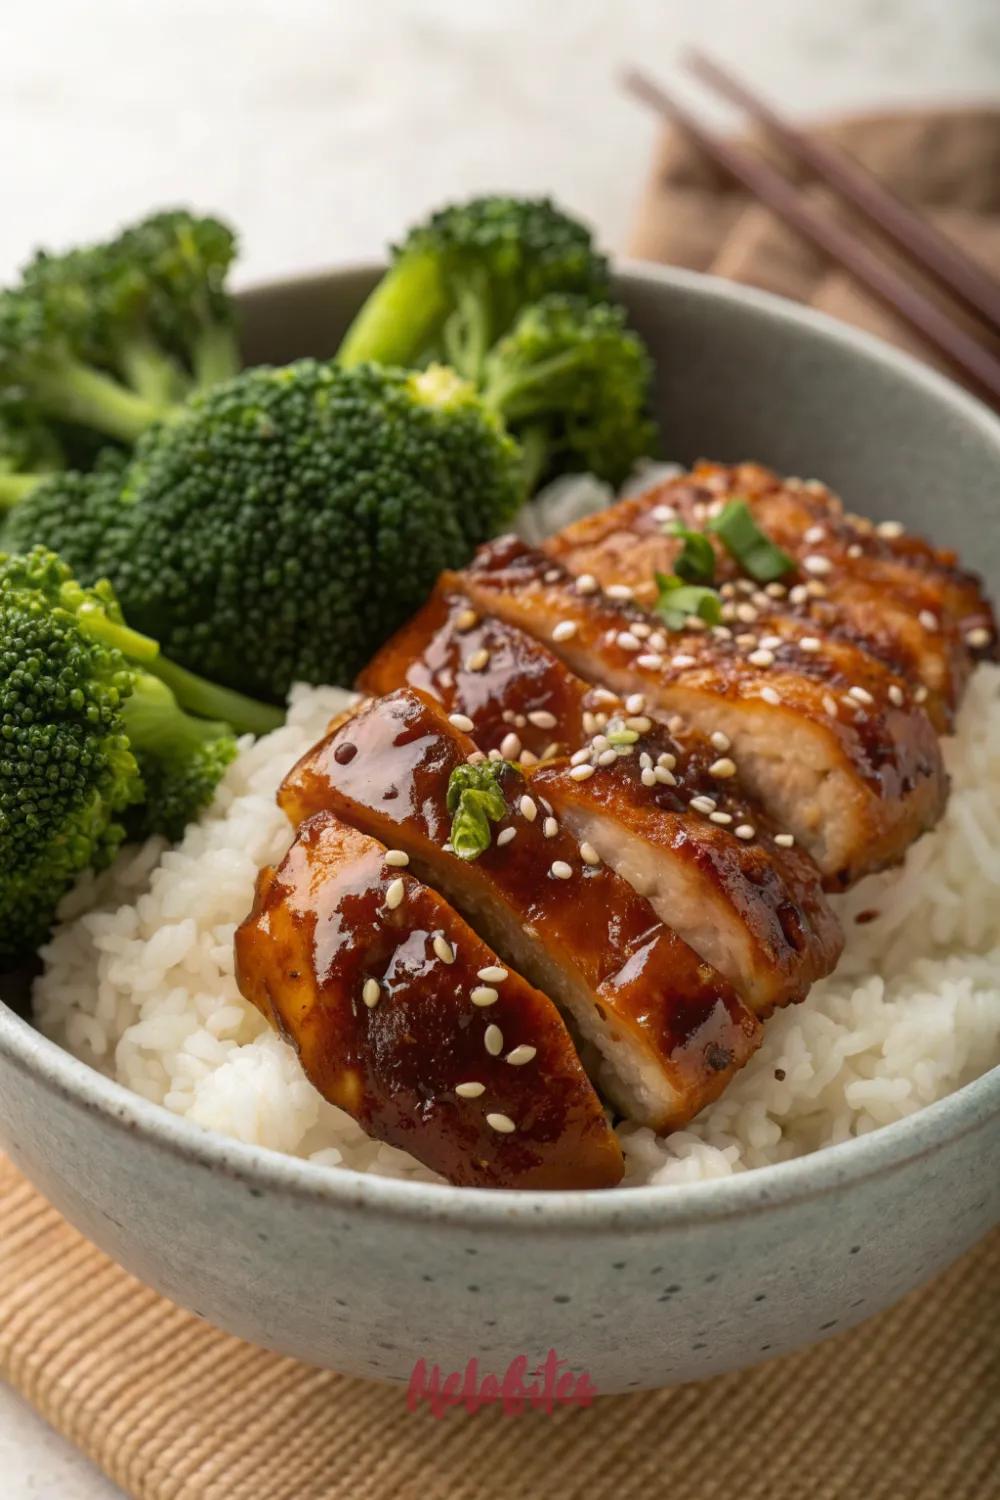
- Serve the chicken hot over a bed of steamed rice.
- Garnish with toasted sesame seeds and sliced green onions.
The “Hands-Off” Version: Sheet Pan Teriyaki Chicken
Want to make this with a side of veggies all at once? This is the perfect “hands-off” alternative. It’s a different texture (more roasted than seared) but just as delicious.
Here’s What You’ll Need:
- 2 lbs boneless, skinless chicken thighs (kept whole)
- 1 large head of broccoli, cut into florets
- 1 red bell pepper, cut into chunks
- 1 batch of the Teriyaki Sauce (from the main recipe)
- 1 tablespoon cornstarch (our “secret” for this version)
How to Make It (The “Baked & Glazed” Way):
- Preheat Your Oven: Get your oven preheating to 425°F (220°C).
- Make the Glaze (Stovetop):
- In a small saucepan, combine your soy sauce, mirin, sake, and sugar.
- In a tiny separate bowl, make a “slurry” by whisking the 1 tablespoon of cornstarch with 1 tablespoon of cold water.
- Add the slurry to the saucepan.
- Bring the sauce to a simmer over medium heat, whisking constantly, until it is thick and glossy (about 2-3 minutes).
- Remove from the heat.
- Prep the Pan:
- On a large, foil-lined baking sheet, toss your whole chicken thighs, broccoli florets, and red bell pepper chunks with a tablespoon of oil.
- Arrange everything in a single, even layer.
- The First Bake:
- Bake in the hot oven for 15 minutes.
- The “Glaze and Blast”:
- After 15 minutes, remove the pan.
- Generously brush about half of your thickened teriyaki glaze all over the chicken and vegetables.
- Return the pan to the oven and bake for another 5-7 minutes.
- The Final Glaze:
- Remove the pan one last time.
- Brush the remaining glaze all over everything.
- (Optional: Turn the oven to BROIL and broil for 1-2 minutes to get a beautiful, bubbly char. Watch it like a hawk!).
- Serve: Let it rest for 5 minutes before slicing the chicken.
Saving Your Creation: Storage and Reheating
This recipe makes for phenomenal leftovers. The glaze soaks into the chicken, and the flavor just gets better. This is a meal-prep dream.
- In the Refrigerator:
- Let the chicken cool completely.
- Store it in an airtight container for up to 4 days.
- It’s fantastic with rice for lunch the next day.
- In the Freezer:
- You can absolutely freeze the cooked chicken.
- Place it in a freezer-safe bag or container (with all its glorious sauce).
- It will keep for up to 3 months.
- Thaw overnight in the fridge.
- How to Reheat:
- The best way is in a skillet.
- Add the chicken and sauce to a pan over medium-low heat.
- Add 1-2 tablespoons of water or chicken broth to loosen the glaze.
- Heat, stirring gently, until warmed through.
Make It Your Own: Simple Twists and Swaps
This recipe is a perfect blueprint. Once you master the sauce, you can use it on anything. Here are a few of my favorite variations.
- Teriyaki Salmon:
- This is a classic.
- Pan-sear 4 salmon fillets (skin-side down first, if you have skin).
- When the salmon is almost cooked, flip it, add the sauce, and let it bubble and glaze the fish for 2-3 minutes.
- Teriyaki Beef:
- Use 1.5 lbs of thinly sliced flank steak.
- Sear it very quickly in a smoking-hot pan (in batches!).
- Remove the steak, make the sauce, and toss the steak back in at the very end.
- Ground Chicken (or Turkey):
- This is a great, fast, kid-friendly option.
- Brown 1.5 lbs of ground chicken with the aromatics.
- Pour in the sauce and let it bubble and thicken.
- Serve it over rice like a donburi bowl.
- Make it Spicy:
- Add 1-2 teaspoons of Sriracha or a big pinch of red pepper flakes to your sauce mixture.
- The Veggie Boost:
- Toss in a bag of snow peas or some broccoli florets during the last 2 minutes of the sauce simmering.
- They will steam right in the pan and get coated in the glaze.
My Top Tips for Teriyaki Perfection
I’ve made this hundreds of times. These are the small things that make a huge difference. Follow these tips, and your teriyaki will be perfect.
- Chicken Thighs are the Key.
- I’m saying it one last time.
- Breasts will work, but they will be drier and less flavorful.
- Thighs are the secret to that juicy, “better than takeout” taste.
- Don’t Crowd the Pan. Ever.
- This is the #1 rule of searing meat.
- If you put too much chicken in the pan, the temperature will drop.
- The chicken will steam in its own juices and turn a sad, pale gray.
- You must cook in batches to get that golden-brown crust.
- Grate Your Aromatics.
- Don’t just chop your garlic and ginger.
- Use a microplane or the small side of a box grater.
- Grating them releases more of their oils and creates a “paste” that melts into the sauce.
- You get all the flavor with no chunky, bitter bits.
- Trust the Sauce. It Will Thicken.
- When you first pour the sauce in, it will look so thin.
- You will be tempted to add cornstarch. Don’t do it (unless you’re baking).
- The sugar and mirin are full of sugars.
- As the sauce bubbles and the water evaporates, those sugars will caramelize and create a natural, glossy, syrupy glaze.
- Use Mirin and Sake, Not Substitutes.
- You can substitute them, but the flavor won’t be the same.
- Mirin provides a unique, glossy sweetness that rice vinegar (which is sour) can’t replicate.
- Sake provides an “umami” depth that broth doesn’t have.
- They are worth buying. A bottle of each will last you for months.
Your Teriyaki Questions, Answered
- What is Mirin, and do I really need it?
- Mirin is a sweet Japanese rice wine used for cooking. It’s one of the “four pillars” of teriyaki. It’s what gives the sauce that perfect gloss and body. You can find it in the Asian or international aisle of any major grocery store.
- What if I can’t find Sake or don’t want to use alcohol?
- No problem. While sake adds authentic depth, you can substitute it. The best 1-to-1 swap is low-sodium chicken broth. You can also just use 1/4 cup of water.
- My sauce never got thick! What did I do wrong?
- You just didn’t let it bubble long enough. You need to let it simmer (or even boil) to let the water evaporate and the sugars reduce and caramelize. Give it another 3-4 minutes of bubbling, and it will thicken.
- Can I use this as a marinade?
- You can, but it’s not the traditional method. Teriyaki is a glaze applied during cooking. If you do marinate, only do so for 30 minutes. The soy sauce can “cure” the chicken and make it tough if left too long.
- Is this recipe authentic?
- It’s a very authentic, traditional “glaze” recipe. Many modern or Americanized recipes use cornstarch for thickening, or add pineapple juice. This recipe is closer to the simple, classic Japanese combination of soy, mirin, sake, and sugar.
This is it. This is your ticket to ditching the bottle for good. This Homemade Teriyaki Chicken Recipe is the fast, kid-friendly, and delicious weeknight meal you’ve been looking for.
If you make this and love it (and you will), don’t keep it a secret. Pin this recipe on Pinterest, share it with a friend, and let’s end the tyranny of gloopy teriyaki sauce forever. Enjoy!


Leave a Comment