What’s the plan for this weekend? If you’re a parent, that question can sometimes feel a little daunting, as you search for meaningful activities that don’t involve a screen but also don’t require a ton of planning or a small fortune. But what if I told you the best memories are waiting to be made right in your own kitchen?
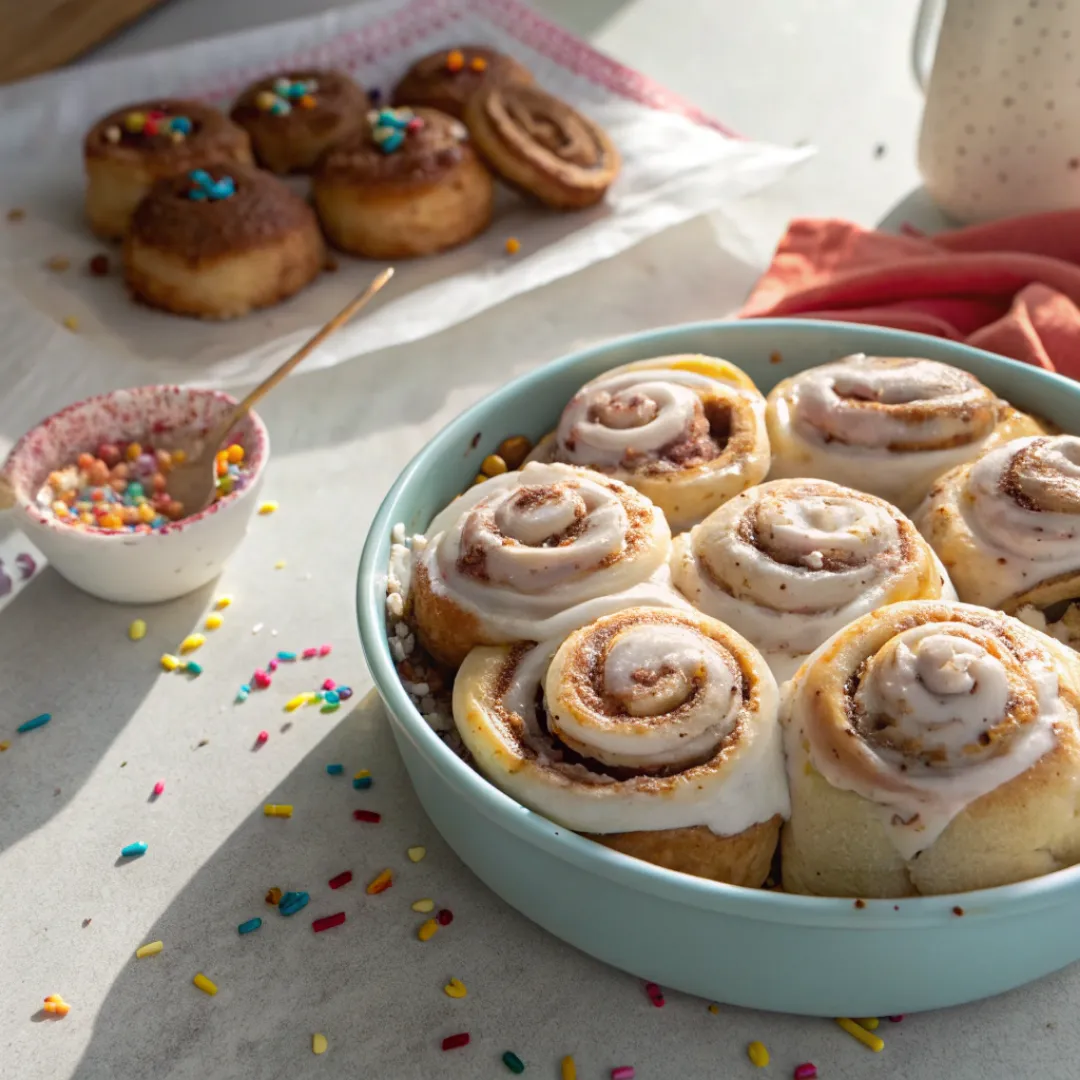
There is a special kind of magic that happens when you bake with your children. It’s a sensory adventure filled with laughter, a little bit of mess, and the incredible aroma of something delicious taking shape. Get ready to create the perfect weekend project: a batch of warm, gooey cinnamon rolls made with the most important ingredient of all, your little one’s help.
Creating Joy with Kid-Friendly Cinnamon Rolls
This recipe for Kid-Friendly Cinnamon Rolls is more than just a set of instructions; it’s a blueprint for connection. It’s specifically designed to have simple, manageable steps that are perfect for little hands and budding chefs. Every stage, from dumping flour into a bowl to spreading the cinnamon filling, is an opportunity for your child to participate.
We’re not aiming for bakery-perfect rolls here; we’re aiming for a perfectly fun experience. The goal is to embrace the slightly lopsided rolls and the sprinkle of flour on the floor as signs of a morning well spent. This is a recipe that prioritizes the process over perfection, making it a stress-free activity for everyone involved.
The Best of Easy Kids Baking and Family Weekend Activities
This project is the perfect intersection of easy kids baking and memorable family weekend activities. Unlike other crafts that get stored in a box, this is an activity that ends with a tangible, delicious reward that everyone gets to share. It engages all the senses and creates a powerful, positive memory associated with food and family.
It’s an affordable and accessible way to fill a Saturday morning with purpose and fun. You’re not just killing time; you’re building your child’s confidence, teaching them valuable life skills, and strengthening your bond. This is how you transform a regular weekend into one of those core memories your kids will cherish for years.
How to Get Kids Involved in Baking Cinnamon Rolls
So, you’re ready to learn how to get kids involved in baking cinnamon rolls? The key is to break down the recipe into age-appropriate “jobs” that make them feel like an essential part of the team. Think of yourself as the head chef and your child as your most enthusiastic (and cutest) sous chef.
For toddlers, their job might be stirring the dry ingredients or patting the dough gently. Older kids can help measure ingredients, crack an egg, or even help roll out the dough with their own small rolling pin. By assigning these roles, you empower them and give them a sense of ownership over the final, delicious product.
Why You’ll Love These Kid-Friendly Cinnamon Rolls
- Designed for Participation: Every step has a kid-friendly task, making it a truly collaborative and engaging project from start to finish.
- Builds Core Memories: The shared experience of creating something delicious together is a powerful way to bond and make lasting memories.
- Simple and Forgiving: The recipe is straightforward and doesn’t require perfection, so there’s no stress if things get a little messy or imperfect.
Nutritional Benefits
While the finished cinnamon rolls are a sweet indulgence, the true benefits of this recipe are developmental. Baking is a fantastic, hands-on learning experience for children of all ages. It’s a delicious disguise for a lesson in math, science, and fine motor skills.
Measuring flour and sugar introduces them to fractions and counting. Watching the yeast make the dough rise is a fantastic, real-life science experiment. Stirring, kneading, and sprinkling all help to develop their coordination and dexterity, all valuable skills for their educational journey.
Full Recipe for Kid-Friendly Cinnamon Rolls

Prep Time: 25 minutes | Cook Time: 20-25 minutes | Total Time: 1 hour 50 minutes (includes rising) | Yield: 12 Rolls | Category: Breakfast, Kids Activity | Method: Baking | Cuisine: American | Diet: Vegetarian
Essential Ingredients for Kid-Friendly Cinnamon Rolls
For the Easy Dough:
- 3 cups (375g) all-purpose flour, plus more for dusting
- 1 cup (240ml) whole milk, warmed
- ¼ cup (57g) unsalted butter, melted
- ¼ cup (50g) granulated sugar
- 1 large egg
- 2 ¼ teaspoons instant yeast (1 packet)
- ½ teaspoon salt
For the Gooey Filling:
- ½ cup (100g) packed brown sugar
- ¼ cup (57g) unsalted butter, very soft
- 1 ½ tablespoons ground cinnamon
For the Fun Icing:
- 1 cup (120g) powdered sugar
- 2-3 tablespoons milk
- ½ teaspoon vanilla extract
- Rainbow sprinkles (optional, but highly recommended by kids!)
Ingredient Notes
- Instant Yeast: This type of yeast is fantastic for baking with kids because you can mix it right in with the flour. There’s no need for a separate, delicate activation step, which helps keep the process moving and holds their attention.
- Warm Milk: Make sure the milk is just warm, not hot. A good rule of thumb is that it should feel comfortably warm on your wrist. This gentle warmth wakes up the yeast and helps the dough rise beautifully.
- Very Soft Butter: For the filling, using very soft (but not melted) butter makes it incredibly easy for little hands to help spread it over the dough with the back of a spoon or a small spatula.
- Sprinkles: While optional for adults, sprinkles are a non-negotiable ingredient for most kids. They add a pop of color and fun, making the final product feel uniquely theirs.
How to Make Kid-Friendly Cinnamon Rolls (Detailed Steps)
- Kid’s Job: Mix Dry Ingredients! In a large bowl, let your child help you measure and dump in the flour, sugar, instant yeast, and salt. Give them a whisk or a spoon and let them stir it all together. This is a great, low-mess first step.
- Adult’s Job: Combine the Wet Ingredients. In a separate measuring cup, whisk together the warm milk, melted butter, and the egg. This step is best for an adult to ensure the temperature is right and the egg is fully incorporated.
- Kid’s Job: Make the Dough! Pour the wet mixture into the dry ingredients. Let your child use a wooden spoon (or their clean hands!) to mix everything together until a sticky dough forms.
- Adult’s Job: A Quick Knead. Turn the dough onto a lightly floured surface and knead for just 3-4 minutes until it’s smooth and elastic. Let your child pat and poke the soft dough before placing it back in the bowl.
- Let it Rise: Cover the bowl and place it in a warm spot for about an hour, or until doubled in size. This is a great time to play a quick game or read a story while the yeast does its magic.
- Kid’s Job: Make the Filling! While the dough rises, have your child help mix the soft butter, brown sugar, and cinnamon in a small bowl. Mashing it all together with a fork is a fun and easy task for them.
- Kid’s Job: Roll and Spread! Once risen, place the dough on a floured counter and let your child help you roll it into a large rectangle. Then, let them go to town spreading the gooey cinnamon filling all over the dough.
- Adult’s Job: Roll and Slice. Tightly roll the dough into a log and use a sharp knife or dental floss to slice it into 12 rolls. Place the rolls in a greased 9×13 inch pan, and let your child help arrange them.
- Bake and Ice: Let the rolls rest for 20 minutes while you preheat the oven to 375°F (190°C). Bake for 20-25 minutes until golden, then let them cool slightly before the final, most exciting step.
- Kid’s Job: Decorate! Mix the icing ingredients together. Give your child a spoon and let them drizzle the icing all over the warm rolls, then finish with a generous shower of rainbow sprinkles.
Storage Options
If you have any cinnamon rolls left after your baking adventure, simply cover the pan tightly. They will keep nicely at room temperature for about 2-3 days. There’s no need to refrigerate them unless your kitchen is very warm.
To reheat, a quick 15-20 seconds in the microwave is all it takes to make them soft and warm again. This makes for an incredibly easy and special breakfast on a busy weekday morning. It’s a delicious reminder of your fun weekend project.
Variations and Substitutions
- Chocolate Chip Surprise: Add a handful of mini chocolate chips to the cinnamon-sugar filling. This is a guaranteed way to make your little baker’s eyes light up with excitement.
- Fruity Fun Rolls: Instead of the cinnamon filling, spread a layer of your child’s favorite fruit jam, like strawberry or raspberry, over the dough before rolling it up.
- Make it Easier with Canned Dough: If you’re short on time or baking with very young toddlers, don’t hesitate to use a can of refrigerated biscuit or crescent roll dough. Just unroll, fill, re-roll, slice, and bake according to package directions.
Practical & Valuable Tips
- Embrace the Mess: This is the most important tip. Go into the project knowing that there will be flour on the counter and maybe some dough on the floor. Use a splat mat, put an apron on your child, and focus on the fun, not the cleanup.
- Prep in Advance (Mise en Place): Before you invite your child into the kitchen, pre-measure all the ingredients into small bowls. This keeps the process moving smoothly and allows your child to focus on the fun parts, like dumping and mixing.
- Assign Age-Appropriate Jobs: Give toddlers simple tasks like stirring or sprinkling. As kids get older, they can graduate to measuring, cracking eggs, and eventually helping to roll out the dough.
Frequently Asked Questions
- What is the best age to start baking these rolls with my kids? You can start at almost any age! A two-year-old can help with dumping pre-measured ingredients and sprinkling. A five-year-old can help with mixing and spreading. The key is to supervise them closely and assign tasks that match their ability.
- How do I handle the inevitable mess when baking with children? Preparation is everything. Lay down a cheap plastic tablecloth on the floor, have a damp cloth ready for sticky fingers, and pre-measure ingredients to minimize spills. Most importantly, adjust your mindset to see the mess as part of the fun.
- My child has a short attention span. How can I keep them engaged? The beauty of this recipe is that it has a built-in break during the dough’s rising time. You can do the initial mixing, then go play, and come back an hour later for the fun part of rolling and filling. Keeping the active steps short and sweet is the key.
- Are there any steps that are absolutely unsafe for kids? Yes. Any task involving the hot oven should always be handled by an adult. Slicing the rolls with a sharp knife is also a grown-up job, though you can let your child use a plastic knife to “help” you mark where the cuts should go.
- Can we decorate with something other than sprinkles? Of course! You could top the rolls with a sprinkle of cinnamon, mini M&Ms, or finely chopped nuts (if there are no allergies). Let your child’s creativity be the guide to making these rolls uniquely their own.
These Kid-Friendly Cinnamon Rolls are so much more than a recipe; they are an invitation to slow down and create something wonderful together.
So, gather your little helpers, pin this project to your “Fun with Kids” board on Pinterest, and get ready to bake up some delicious, lasting memories!


Leave a Comment