Have you ever walked into your kitchen, looked at a whole chicken, and felt a tiny spark of trepidation? Maybe it seemed daunting, a culinary Everest waiting to be conquered. Well, let me tell you, it’s far less intimidating than you think, and the rewards are absolutely magnificent.
Today, we’re going to dive headfirst into the wonderful world of whole chicken recipes. Forget those dry, flavorless birds you might have encountered in the past. We’re talking about succulent, juicy meat, shatteringly crispy skin, and a beautiful aroma that will fill your home with warmth and anticipation. Are you ready to become a roasting champion?
Why You’ll Love Cooking a Whole Chicken

There’s a certain magic that happens when you roast a whole chicken. It’s more than just a meal; it’s an experience. The golden-brown skin, the tender meat falling off the bone, the rich pan drippings – it all comes together to create something truly special.
Beyond the deliciousness, cooking a whole chicken is incredibly economical. You get multiple meals out of one purchase, from Sunday dinner to leftovers that transform into delicious lunches or even another dinner later in the week. Talk about getting more bang for your buck!
Essential Ingredients for Roasting Success
You might be surprised at how simple the ingredient list is for a truly spectacular roasted chicken. Often, less is more when you’re working with quality produce. Think of it like a blank canvas, ready for your artistic touch.
The beauty of a whole chicken is its versatility. While we’ll cover the basics, remember that you can always add your own flair. A good foundation, however, is key.
Essential Ingredients (Whole Chicken Recipes)
- 1 whole chicken (3-5 pounds), giblets removed
- 2 tablespoons olive oil or melted butter
- 1 tablespoon kosher salt
- 1 teaspoon black pepper
- 1 teaspoon paprika (optional, for color and mild flavor)
- 1 lemon, halved
- 1 head garlic, halved crosswise
- Fresh herbs (rosemary, thyme, sage), a few sprigs
Ingredients Notes (Whole Chicken Recipes)
- Chicken Size: A 3-5 pound chicken is ideal for even cooking. Smaller chickens cook faster, larger ones take longer.
- Olive Oil vs. Butter: Both work beautifully. Olive oil provides a slightly crisper skin, while butter adds a rich, golden hue and flavor. Experiment to see what you prefer!
- Salt & Pepper: These are your absolute essentials. Don’t be shy with the salt; it’s crucial for flavor and moisture retention.
- Paprika: This adds a lovely reddish-brown color to the skin and a hint of smoky flavor. Totally optional but recommended for visual appeal.
- Lemon & Garlic: These aromatic additions infuse the chicken with incredible flavor from the inside out. They also help keep the cavity moist.
- Fresh Herbs: Rosemary, thyme, and sage are classic choices that complement chicken perfectly. If you don’t have fresh, a teaspoon of dried herbs can work in a pinch.
Mastering the Art of Roasting

Now for the fun part: getting that chicken into the oven! Roasting a chicken isn’t about complicated techniques; it’s about understanding a few fundamental principles that guarantee a perfectly cooked bird every time. Think of it as a dance: preparation, heat, and patience.
You’re about to discover how easy it is to achieve that coveted crispy skin and unbelievably tender interior. It’s simpler than you might imagine, I promise.
How to make (Whole Chicken Recipes)
- Preparation is Key:
- Preheat your oven to 425°F (220°C).
- Remove the chicken from its packaging and pat it thoroughly dry with paper towels. This is CRUCIAL for crispy skin. Seriously, don’t skip this step!
- Remove the giblets from the cavity. You can discard them, or save them for gravy or stock.
- Place the chicken breast-side up in a roasting pan or on a wire rack set in a baking sheet.
- Seasoning Like a Pro:
- Drizzle the olive oil or melted butter all over the chicken, using your hands to rub it evenly over the skin. Don’t forget the nooks and crannies!
- Sprinkle the kosher salt, black pepper, and paprika (if using) generously over the entire surface of the chicken. Get it everywhere – top, bottom, and sides.
- Stuff the lemon halves, garlic halves, and fresh herb sprigs into the chicken cavity. This adds incredible aromatics and flavor from the inside out.
- Roasting to Perfection:
- Place the chicken in the preheated oven.
- Roast for 15 minutes at 425°F (220°C). This high initial heat helps to get the skin crispy.
- Reduce the oven temperature to 375°F (190°C) and continue roasting for another 60-75 minutes, or until an instant-read thermometer inserted into the thickest part of the thigh (without touching the bone) reads 165°F (74°C).
- If the skin starts to brown too quickly, you can loosely tent it with aluminum foil.
- Resting for Juiciness:
- Once the chicken reaches the target temperature, remove it from the oven and transfer it to a cutting board.
- Tent it loosely with aluminum foil and let it rest for at least 10-15 minutes before carving. This resting period is vital! It allows the juices to redistribute throughout the meat, ensuring a supremely juicy and flavorful chicken. If you cut it too soon, all those delicious juices will simply run out onto your board.
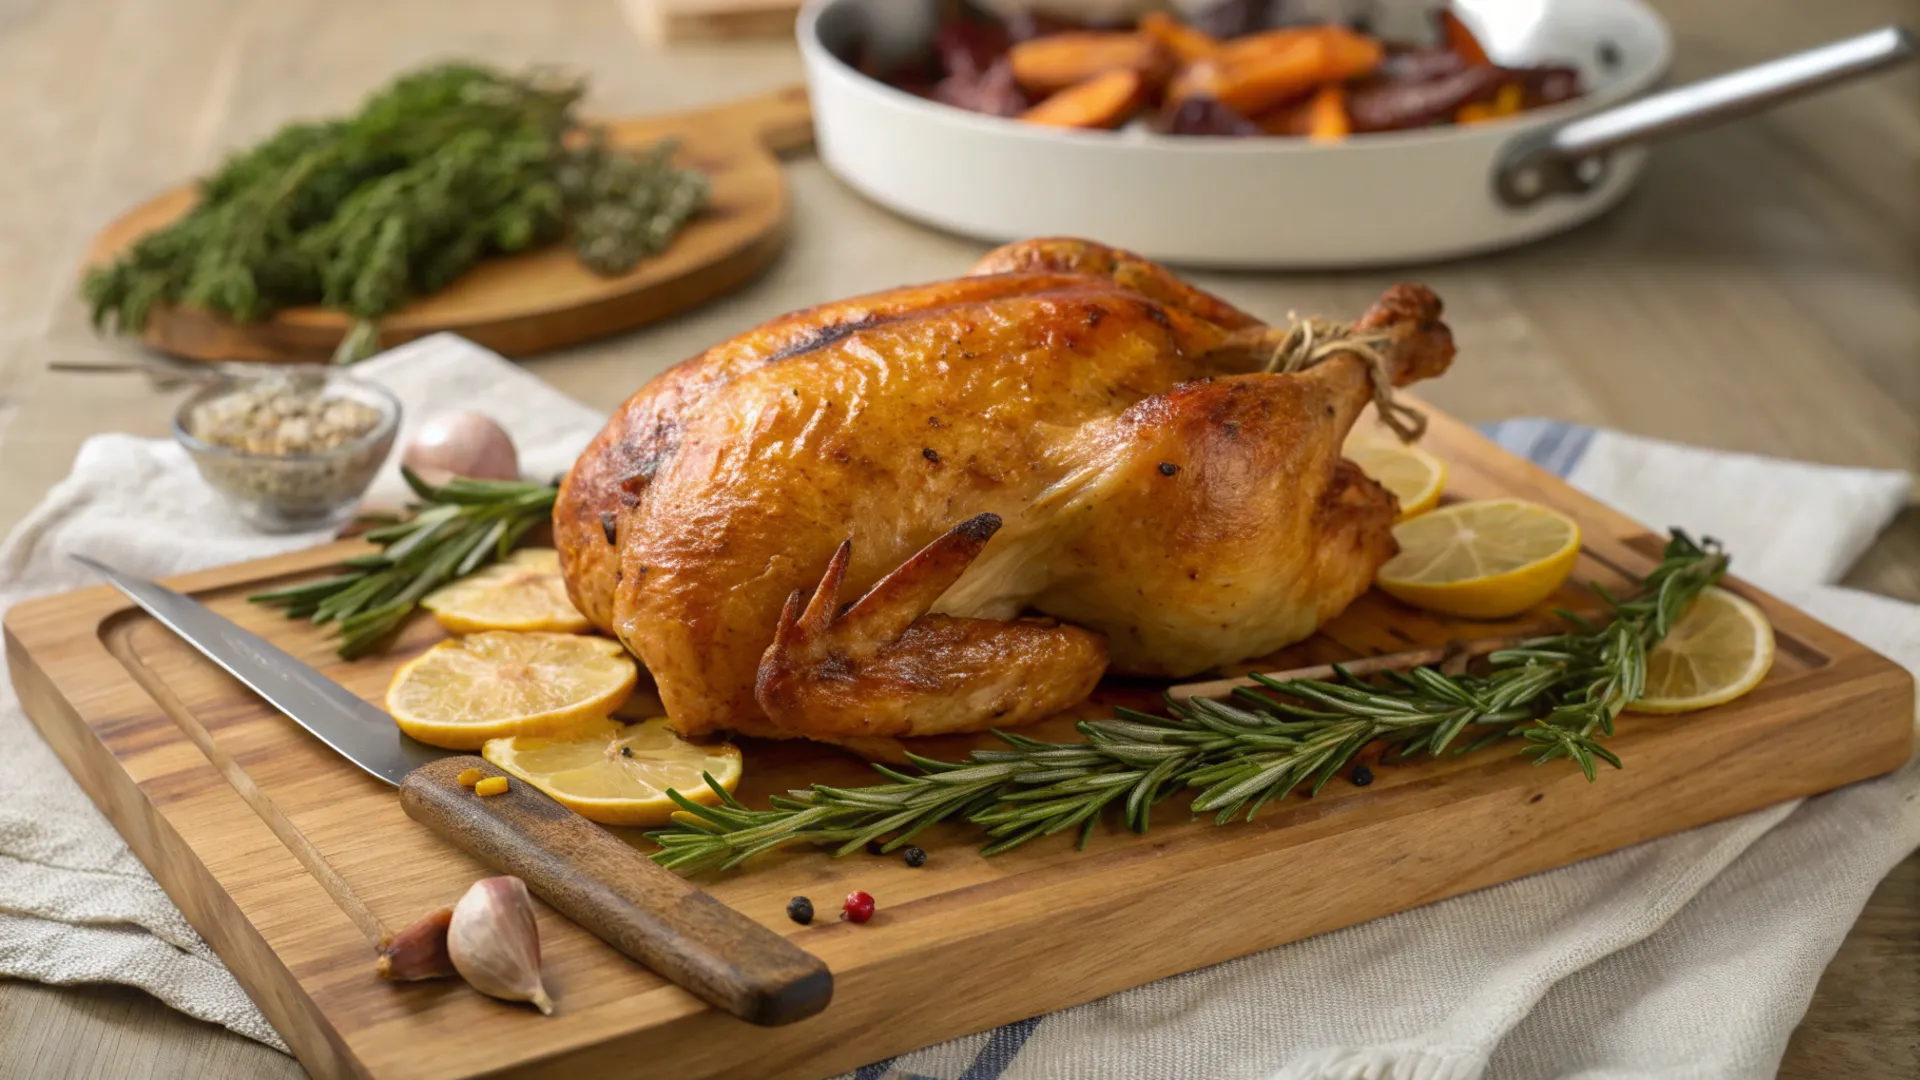
- Carving and Serving:
- Carve your beautifully roasted chicken and serve immediately. Don’t forget to spoon some of those amazing pan drippings over the meat!
Pro Tips for Crispy Skin and Juicy Meat
Want to elevate your roasting game even further? A few simple tricks can make all the difference between a good roasted chicken and an unforgettable one. It’s about paying attention to those little details that separate the amateurs from the pros.
Think of it as fine-tuning your masterpiece. These small adjustments lead to big results.
- Pat it Dry, Dry, Dry: I can’t emphasize this enough. Moisture is the enemy of crispy skin. The drier the skin, the crispier it will get. Give it a good pat down with paper towels before seasoning.
- Don’t Overcrowd the Pan: If you’re roasting vegetables alongside your chicken, make sure not to overcrowd the pan. Give everything space to breathe, allowing for proper air circulation and browning.
- Trussing (Optional but Recommended): Trussing the chicken (tying the legs together and tucking the wings) helps the chicken cook more evenly and creates a more compact shape for better presentation. There are plenty of easy trussing tutorials online if you want to give it a try.
- Use a Meat Thermometer: This is your best friend in the kitchen when it comes to cooking meat safely and perfectly. Don’t rely on guesswork! An instant-read thermometer takes all the mystery out of knowing when your chicken is done.
- Basting – Yay or Nay? Some people swear by basting, but it can actually lower the oven temperature and prevent crispy skin. If you want to baste, do it sparingly and quickly to minimize heat loss. Often, the fat from the skin is enough to keep things moist.
- Don’t Skip the Rest! This is perhaps the most critical step for juicy meat. The resting period allows the muscle fibers to relax and reabsorb the juices. Cutting too soon means a dry chicken.
Storage, Variations, and FAQs

So, you’ve roasted a magnificent chicken. Now what? From storing leftovers to transforming them into new culinary creations, the journey doesn’t end when the carving knife comes out. There’s so much more life in that bird!
And what about those lingering questions you might have? We’ll tackle some common queries to ensure you feel completely confident in your whole chicken adventures.
Storage Options
- Refrigeration: Once the chicken has cooled completely, carve any remaining meat off the bone and store it in an airtight container in the refrigerator for up to 3-4 days.
- Freezing: Cooked chicken meat can be frozen for up to 3-4 months. Place cooled, carved chicken in a freezer-safe bag or container, removing as much air as possible.
- Chicken Stock: Don’t throw away that carcass! It’s pure gold for making homemade chicken stock. Simmer the bones with some vegetables (carrots, celery, onion) and herbs for a few hours to create a flavorful base for soups, stews, or gravies.
Variations and Substitutions
The beauty of a whole chicken recipe is its adaptability. Once you master the basic roast, you can play around with endless flavor combinations. Think of it as your culinary playground!
Don’t be afraid to experiment and make it your own. That’s where the real fun begins in the kitchen.
- Herb Variations: Instead of rosemary and thyme, try sage and marjoram, or even a blend of Italian herbs.
- Spice Rubs: Get creative with your dry rubs! Think smoky paprika and cumin, or a zesty lemon-pepper blend. A little cayenne can add a nice kick.
- Citrus & Aromatics: Beyond lemon and garlic, try stuffing the cavity with orange slices, onion wedges, or even apple chunks for different flavor profiles.
- Vegetable Medley: Roast root vegetables like carrots, potatoes, parsnips, and onions in the same pan as the chicken. They’ll absorb all those delicious drippings and become incredibly flavorful.
- Under the Skin Butter: For extra flavor and moisture, mix softened butter with minced herbs, garlic, and a pinch of salt, then gently rub it under the chicken skin before roasting.
- Spatchcocking: This technique involves removing the backbone and flattening the chicken. It cooks much faster and more evenly, resulting in incredibly crispy skin all over. It’s a game-changer if you’re short on time.
FAQ
Q1: My chicken skin isn’t crispy. What went wrong?
A1: The most common culprit is moisture. Did you pat the chicken very dry before roasting? Also, make sure your oven temperature is high enough initially and that you’re not overcrowding the pan. Basting too frequently can also prevent crisping.
Q2: How do I know when my whole chicken is fully cooked?
A2: The only reliable way is to use an instant-read meat thermometer. Insert it into the thickest part of the thigh, avoiding the bone. It should read 165°F (74°C). The juices should also run clear when pierced, but the thermometer is more accurate.
Q3: Can I roast a frozen whole chicken?
A3: No, it’s not recommended. For food safety and even cooking, a whole chicken must be completely thawed before roasting. Thawing can take 24-48 hours in the refrigerator, depending on its size.
Q4: My chicken is dry. What happened?
A4: Most likely, it was overcooked or not rested long enough. Remove the chicken from the oven as soon as it reaches 165°F (74°C) and let it rest, loosely tented with foil, for at least 10-15 minutes before carving. This allows the juices to redistribute.
Q5: What can I do with leftover roasted chicken?
A5: The possibilities are endless! Think chicken salad sandwiches, tacos, quesadillas, chicken noodle soup, stir-fries, casseroles, or even just warmed up with some roasted vegetables. Don’t forget to use the carcass for stock!
Conclusion
So there you have it, your comprehensive guide to mastering whole chicken recipes. From the moment you bring that bird home to the delicious leftovers you savor days later, the entire process is incredibly rewarding.
You now possess the knowledge and confidence to transform a simple whole chicken into a culinary masterpiece. What are you waiting for? Get roasting, and enjoy the incredible flavors and aromas that will fill your home. Happy cooking!
Print
Simple & Juicy Whole Roast Chicken
A foolproof guide to a perfect whole roast chicken every time. This easy recipe delivers succulent, juicy meat and shatteringly crispy, golden-brown skin using simple ingredients and techniques. It’s the ultimate comforting and impressive main course for a family dinner or special occasion.
- Total Time: 1 hour 45 minutes
- Yield: 6-8 servings
Ingredients
1 whole chicken (3-5 pounds / 1.5-2.5 kg), giblets removed
2 tablespoons olive oil or melted butter
1 tablespoon kosher salt
1 teaspoon freshly ground black pepper
1 teaspoon paprika (optional, for color)
1 lemon, halved
1 head of garlic, halved crosswise
A few sprigs of fresh herbs (e.g., rosemary, thyme, sage)
Instructions
- Prepare the Oven: Preheat your oven to 425°F (220°C).
- Dry the Chicken: Remove the chicken from its packaging and pat it thoroughly dry, inside and out, with paper towels. This step is crucial for crispy skin.
- Season the Chicken: Place the chicken in a roasting pan or on a wire rack set in a baking sheet. Rub the chicken all over with the olive oil or melted butter. In a small bowl, mix the salt, pepper, and optional paprika, then sprinkle it generously all over the chicken.
- Add Aromatics: Stuff the lemon halves, garlic halves, and fresh herb sprigs into the chicken’s cavity. This will infuse the meat with incredible flavor from the inside out.
- Roast the Chicken: Place the chicken in the preheated oven and roast for 15 minutes at 425°F (220°C) to help crisp the skin. Then, reduce the oven temperature to 375°F (190°C) and continue roasting for another 60-75 minutes.
- Check for Doneness: The chicken is done when the juices run clear and an instant-read thermometer inserted into the thickest part of the thigh (without touching bone) reads 165°F (74°C).
- Rest Before Carving: Transfer the roasted chicken to a cutting board. Tent it loosely with foil and let it rest for at least 10-15 minutes before carving to ensure the juices redistribute, resulting in incredibly moist meat.
Notes
Crispy Skin Secret: The most important step for achieving shatteringly crispy skin is to make sure the chicken is patted completely dry before seasoning and roasting. Moisture is the enemy of crispiness.
The Importance of Resting: Do not skip the resting period after the chicken comes out of the oven. This is the key to a juicy, tender bird, as it allows the muscle fibers to relax and reabsorb all the flavourful juices.
Use a Meat Thermometer: For food safety and perfect results, a meat thermometer is your best friend. Guesswork can easily lead to an undercooked or dry, overcooked chicken.
Don’t Waste the Carcass: After carving, save the chicken carcass to make delicious and nutritious homemade chicken stock for future soups and stews.
- Prep Time: 15 minutes
- Cook Time: 1 hour 30 minutes
- Category: Dinner, Main Course
- Method: Roasting
- Cuisine: American, French
- Diet: Gluten Free
Nutrition
- Serving Size: approx. 6 oz (170g) mixed meat
- Calories: 390 kcal
- Sodium: 750mg
- Fat: 24g
- Carbohydrates: 1g
- Protein: 42g


Leave a Comment