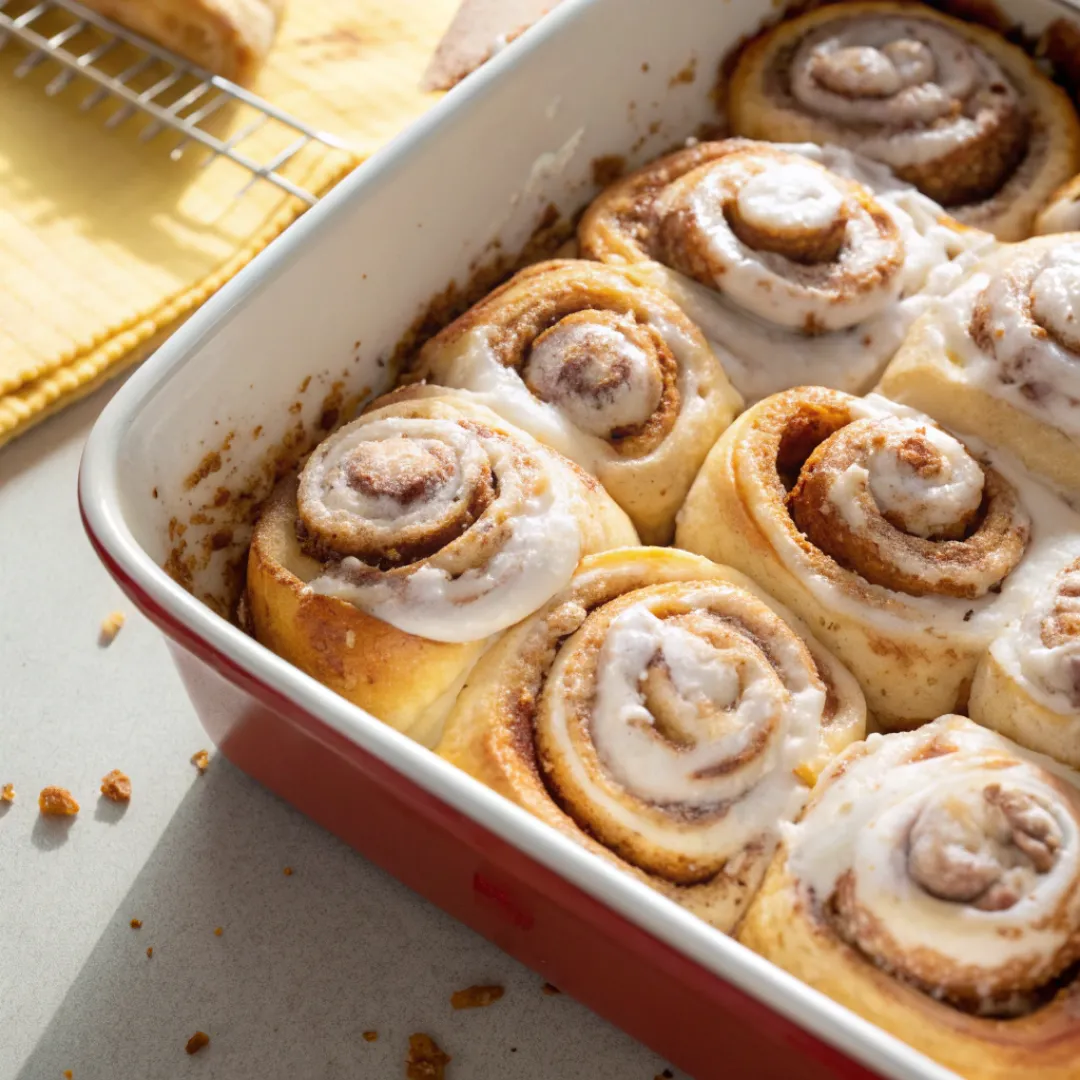
Let’s be honest for a moment. Have you ever followed a cinnamon roll recipe to the letter, only to pull a pan of sad, dense, or dry hockey pucks from the oven? We’ve all been there, facing the crushing disappointment of a bake that didn’t rise, a filling that leaked out, or a texture that was anything but soft and gooey.
It can feel like perfect homemade cinnamon rolls are a mythical creature, reserved only for professional bakers or those with a magical touch. But I am here today to completely shatter that myth and put an end to your baking tragedies forever. This isn’t just another recipe; this is a promise, a step-by-step guide that guarantees fluffy, delicious, and absolutely perfect cinnamon rolls every single time.
Introducing: The Foolproof Cinnamon Roll Method
The core of these Foolproof Cinnamon Rolls is a method built on precision and smart ingredients, designed to eliminate every common point of failure. It’s the result of countless tests and tweaks, all aimed at creating a recipe that is as reliable as the sunrise. We’re taking the guesswork out of baking and replacing it with pure confidence.
This method isn’t about complicated techniques; it’s about understanding the “why” behind each simple step. From using the right kind of flour to ensuring the perfect kneading time, every detail is crafted to guide you to a flawless result. This is your master blueprint for cinnamon roll success.
The Best Beginner Cinnamon Rolls for Baking with Confidence
This recipe is, without a doubt, the best beginner cinnamon rolls you can find, but it’s also perfect for experienced bakers looking for consistency. It’s all about empowering you in the kitchen and helping you start baking with confidence. Imagine knowing, with 100% certainty, that your efforts will be rewarded with a pan of pillowy, perfect rolls.
Think of this recipe as your personal baking instructor, walking you through the process and explaining every move. It’s like having a safety net that lets you explore the joy of yeast baking without any of the fear. The skills and confidence you build here will translate to all your future baking projects, making you a better baker overall.
A Step-by-Step Guide to Making Perfect Cinnamon Rolls
This is more than a recipe; it’s a complete step-by-step guide to making perfect cinnamon rolls. We will leave no stone unturned and no question unanswered. You will learn precisely how long to knead, what the dough should feel like, and the visual cues that tell you it’s perfectly risen.
Each stage is broken down into clear, simple actions that build upon each other, leading you inevitably to a delicious destination. It’s like assembling a piece of furniture with a perfect set of instructions; if you follow the guide, the beautiful result is guaranteed. Say goodbye to kitchen anxiety and hello to predictable perfection.
Why You’ll Love These Foolproof Cinnamon Rolls
- Guaranteed Success: This recipe is meticulously designed to work every time, eliminating the common frustrations of yeast baking.
- Incredible Texture and Flavor: They are the epitome of what a cinnamon roll should be: incredibly soft, chewy, gooey, and packed with flavor.
- Builds Your Baking Skills: By explaining the “why” behind each step, this recipe teaches you the fundamentals of baking and builds your confidence for future projects.
Nutritional Benefits
The greatest benefit of mastering this recipe is the immense joy and satisfaction it brings. Successfully creating a “difficult” baked good from scratch is a powerful mood booster and a tangible accomplishment. This is soul food in its purest form, meant to be shared to create happiness and connection.
Furthermore, baking at home puts you in the driver’s seat of your family’s nutrition. You control the quality of the ingredients, from the flour to the butter, and you can be sure there are no artificial preservatives. Investing in a skill like this is a long-term investment in your home’s health and happiness.
Full Recipe for Foolproof Cinnamon Rolls

Prep Time: 25 minutes | Cook Time: 25-30 minutes | Total Time: 2 hours 30 minutes (includes rising) | Yield: 12 Rolls | Category: Breakfast, Dessert | Method: Baking | Cuisine: American | Diet: Vegetarian
Essential Ingredients for Foolproof Cinnamon Rolls
For the No-Fail Dough:
- 4 ½ cups (565g) bread flour, plus more for dusting
- 1 cup (240ml) whole milk, warmed to 110-115°F (43-46°C)
- ½ cup (100g) granulated sugar
- ½ cup (113g) unsalted butter, softened to room temperature
- 2 large eggs, at room temperature
- 2 ¼ teaspoons instant yeast (1 packet)
- 1 teaspoon salt
For the Gooey Filling:
- 1 cup (200g) packed brown sugar
- ½ cup (113g) unsalted butter, very soft
- 2 ½ tablespoons ground cinnamon
For the Cinnabon-Style Secret:
- ½ cup heavy cream, warmed
For the Perfect Cream Cheese Frosting:
- 8 oz (226g) cream cheese, softened
- ½ cup (113g) unsalted butter, softened
- 2 cups (240g) powdered sugar
- 1 tablespoon milk or cream
- 2 teaspoons vanilla extract
Ingredient Notes
- Bread Flour: This is non-negotiable for a foolproof recipe. The higher protein content in bread flour creates a stronger gluten network, resulting in a chewier, more structured roll that is very forgiving and resistant to becoming dense.
- Instant Yeast: We use instant yeast because it’s reliable and can be mixed directly with the other ingredients. Always check the expiration date on your yeast to ensure it’s fresh and active.
- Room Temperature Ingredients: Using softened butter and room temperature eggs is crucial. They incorporate into the dough more easily, creating a smoother, more uniform texture and promoting a better rise.
- Heavy Cream: This is the game-changing secret. Pouring warmed heavy cream over the rolls before baking creates a gooey, caramel-like sauce at the bottom of the pan, ensuring the rolls are unbelievably moist.
How to Make Foolproof Cinnamon Rolls (Detailed Steps)
- Prepare the Dough: In the bowl of a stand mixer fitted with the dough hook, combine the warm milk, sugar, and instant yeast. Add the softened butter, eggs, salt, and 2 cups of the bread flour. Mix on low speed until just combined.
- Knead to Perfection: Add the remaining 2 ½ cups of bread flour and increase the speed to medium. Knead for 8-10 minutes. The dough is perfectly kneaded when it is smooth, elastic, and passes the “windowpane test” (a small piece can be stretched thin enough to see light through it without tearing).
- First Rise: Form the dough into a ball and place it in a lightly oiled bowl, turning to coat. Cover with plastic wrap and let it rise in a warm place for 60-90 minutes, or until it has doubled in size.
- Create the Filling: While the dough rises, beat the very soft butter, brown sugar, and cinnamon together in a bowl until it forms a thick, uniform paste. This ensures the filling spreads evenly without clumping.
- Shape the Rolls: Gently deflate the risen dough and turn it out onto a lightly floured surface. Roll it into a large 15×20 inch rectangle. Spread the cinnamon filling all the way to the edges.
- Roll and Slice: Tightly roll the dough into a log, starting from a long edge. Use unflavored dental floss or a very sharp serrated knife to slice the log into 12 equal-sized rolls.
- Second Rise: Arrange the rolls in a greased 9×13 inch baking pan. Cover the pan and let the rolls rise again in a warm place for 30-45 minutes, until they look puffy and are touching each other.
- The Secret Step: Preheat your oven to 375°F (190°C). Just before baking, gently warm the heavy cream and pour it evenly over the tops of the risen rolls in the pan.
- Bake: Bake for 25-30 minutes, or until the rolls are a deep golden brown and the centers are set. The internal temperature should be around 190°F (88°C).
- Frost and Serve: While the rolls are baking, beat all the frosting ingredients together until completely smooth and creamy. Let the rolls cool for about 10-15 minutes before slathering them generously with the frosting.
Storage Options
To store these perfect cinnamon rolls, let them cool completely and then cover the pan tightly with foil. They will stay incredibly soft and fresh at room temperature for up to 3 days. There is no need to refrigerate them, as it can dry them out slightly.
If you want to enjoy a warm roll later, just microwave it for about 20-30 seconds. The roll will become steamy and soft, and the frosting will turn into a glorious melted glaze.
Variations and Substitutions
- Citrus Zest: For a bright, fresh flavor, add the zest of one large orange to the filling mixture. Orange and cinnamon are a classic combination that tastes incredible.
- Nutty Crunch: Sprinkle a cup of finely chopped, toasted pecans or walnuts over the cinnamon filling before rolling up the dough for a wonderful textural contrast.
- A Note on Substitutions: This recipe is designed for foolproof results, so substitutions are not highly recommended. Swapping bread flour for all-purpose flour or leaving out the heavy cream will change the final texture, so proceed with that in mind.
Practical & Valuable Tips
- Weigh Your Flour: For the most accurate and repeatable results, use a kitchen scale to weigh your flour. This is the single best thing you can do to improve your baking consistency.
- Use a Thermometer: Don’t guess the milk temperature. A simple instant-read thermometer ensures your milk is in the perfect 110-115°F range to make the yeast thrive.
- Don’t Rush the Rise: Be patient and give the dough the full time it needs to rise. A proper rise develops flavor and is essential for a light, airy texture.
Frequently Asked Questions
- My old cinnamon roll recipes often failed to rise. How does this one prevent that? This recipe tackles that problem in three ways: we use reliable instant yeast (check the date!), we specify the exact milk temperature needed to activate it perfectly, and we provide a clear time frame and visual cue (doubled in size) for a proper rise.
- Why is bread flour so important for this foolproof recipe? Bread flour has a higher protein content than all-purpose flour. This creates a stronger gluten network, which gives the rolls a superior structure, a satisfying chew, and makes the dough more resilient and easier to work with, thus preventing dense results.
- Is the heavy cream trick at the end really necessary? It isn’t strictly necessary for the rolls to bake, but it is essential for the “foolproof” guarantee of an ultra-moist, gooey, Cinnabon-style result. It creates a self-saucing action at the bottom of the pan that is truly game-changing.
- How do I perform the “windowpane test” to know if my dough is kneaded enough? Take a small, golf ball-sized piece of dough and gently stretch it between your fingers. If you can stretch it thin enough to see light pass through it without the dough tearing, the gluten is perfectly developed. If it tears easily, it needs a few more minutes of kneading.
- Can I still make these if I don’t have a stand mixer? Yes, you can absolutely knead this dough by hand. It will take more effort, about 10-15 minutes of consistent kneading on a lightly floured surface. Knead until the dough is smooth, elastic, and passes the windowpane test.
This Foolproof Method for Perfect Cinnamon Rolls is your new go-to guide for guaranteed baking success.
Go ahead, pin this recipe to your “Best Baking Recipes” board on Pinterest, and get ready to bake with total confidence and get amazing results every single time!


Leave a Comment