Hello, dessert fanatics! Let’s talk about the Thanksgiving dessert table. It’s a beautiful sight, but let’s be honest, it’s often dominated by one, single, slightly-predictable pumpkin pie.
We all love it, but what if we could take that classic, comforting flavor and turn it into a showstopping experience? What if we made it elegant, individual, and added the single most satisfying sound in the food world: the crack of a caramelized sugar shell?
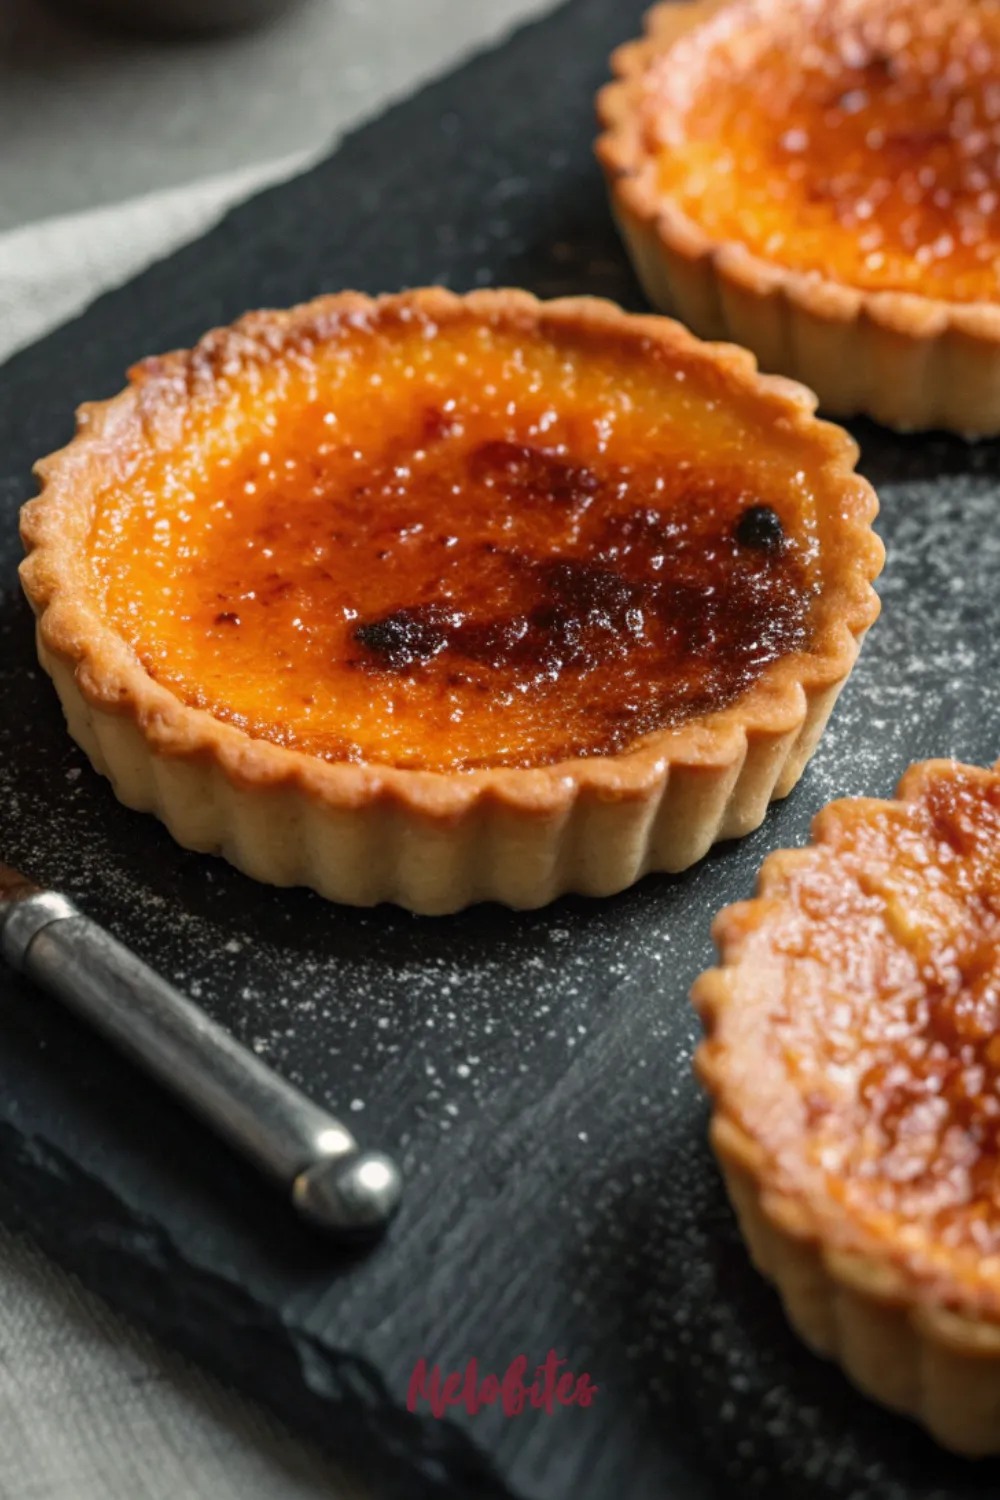
This, my friends, is the Mini Pumpkin Pie Crème Brûlée Tart. It’s the recipe that will make your family and friends stop, stare, and then fight over the last one. This is the holiday showstopper you’ve been waiting for.
The Genius of a Mini Pumpkin Pie Recipe
I am a huge advocate for a mini pumpkin pie recipe, especially for a party. First, let’s talk about the pie-slicing dilemma. Does anyone ever cut a clean slice of pumpkin pie on the first try?
It’s a structural nightmare of soft custard and flaky crust. By making individual tarts, you solve that problem instantly. Everyone gets their own perfect, beautiful, self-contained dessert, and (most importantly) everyone gets the ideal ratio of crust to filling.
Why Crème Brûlée Pumpkin Tarts are Your New Secret Weapon
This isn’t just a tiny pie. This is a brilliant hybrid: half classic pumpkin pie, half sophisticated crème brûlée. We’re making a silky, spiced pumpkin custard, richer than a normal pie, and baking it in a buttery tart shell.
This combination elevates your entire spread of Thanksgiving desserts. It takes the familiar, cozy flavor of fall baking and gives it an elegant, restaurant-quality makeover. It’s the best of both worlds, and it is absolutely unforgettable.
The Ultimate Individual Pumpkin Desserts for a Party
If you’re hosting, you know the value of a make-ahead dish. These tarts are the perfect individual pumpkin desserts for a party precisely because they must be made ahead. You bake the tarts, fill them, and let them chill completely, up to two days in advance.
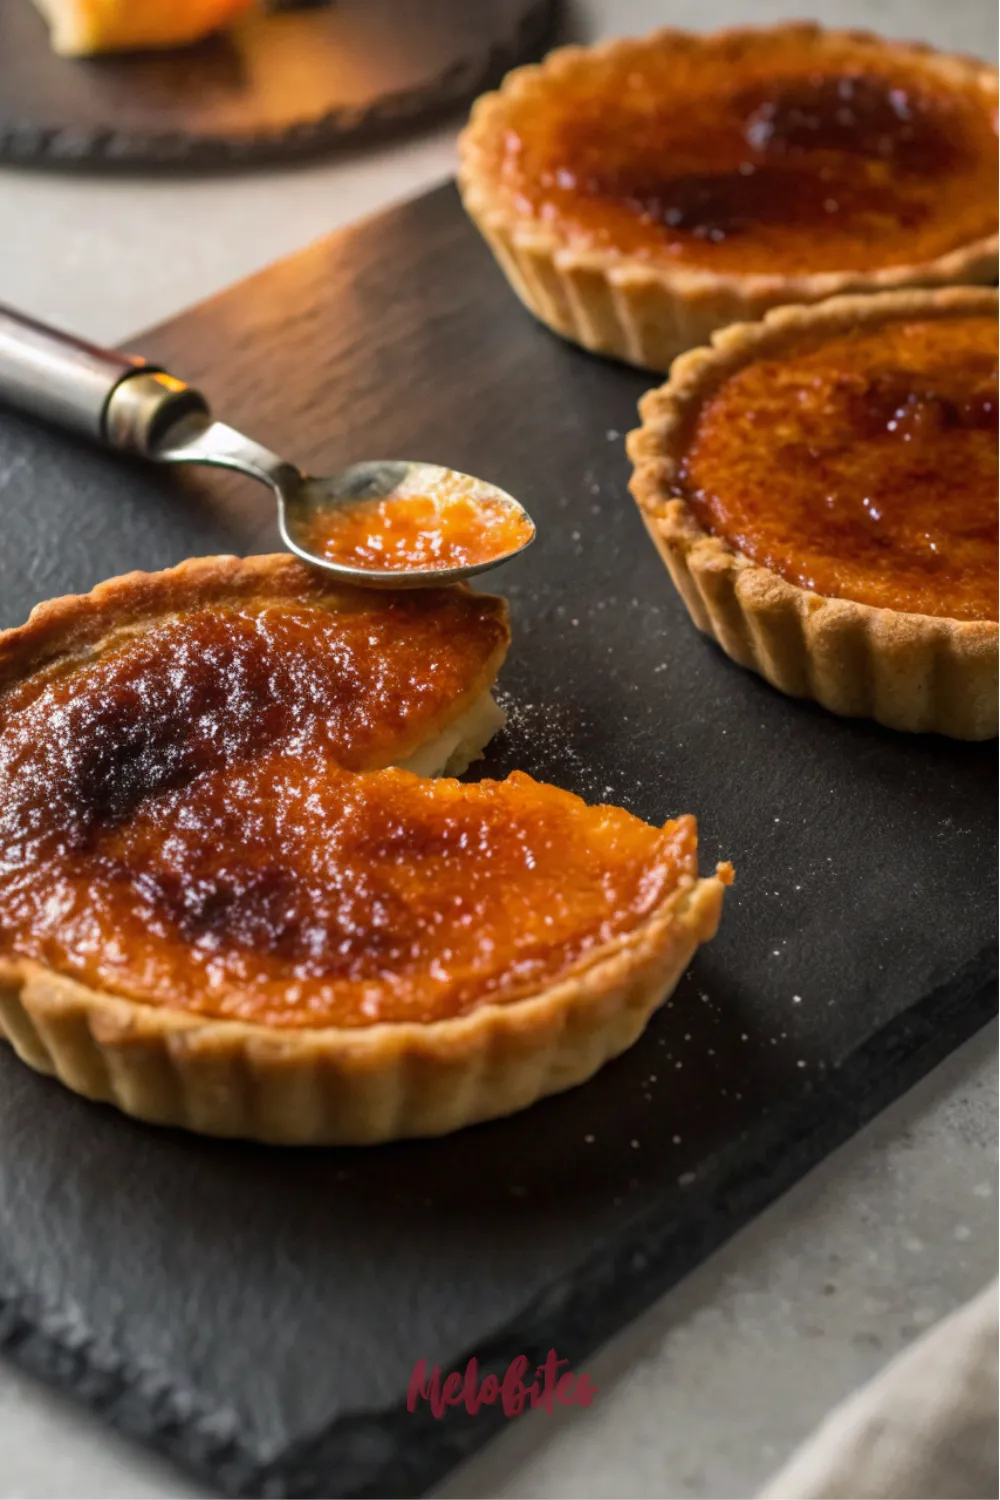
The real magic happens right before you serve. You’ll line up the tarts, sprinkle them with sugar, and torch them right in front of your guests. It’s dinner and a show, and that crackling, smoking, caramelizing sugar moment is what your friends will be talking about for weeks.
Why You’ll Be Obsessed with This Mini Pumpkin Pie Recipe
- The Texture Trio: You get three perfect textures in one bite: the buttery, crisp tart shell; the silky, smooth pumpkin custard; and the shattering, glassy sugar top.
- The “Wow” Factor: Breaking out a kitchen torch at a party makes you look like a total pro. It’s an interactive, exciting, and impressive end to any meal.
- Perfect Portions: They are elegant, easy to serve, and you don’t have to worry about messy slicing.
- Make-Ahead Perfection: This recipe is designed to be made in advance, which frees up your time and your oven on the big holiday.
Nutritional Benefits
Let’s be perfectly clear: this is a glorious, indulgent dessert. This is what you serve when you want to celebrate! We’re not skimping on the butter or the cream.
But, the wonderful thing about homemade dessert recipes is that you know exactly what’s inside. We’re using real, wholesome ingredients. The pumpkin puree is a powerhouse of Vitamin A and fiber, and the eggs provide protein. Plus, these are portion-controlled, so it’s indulgence in a smart, individual package.
Full Recipe: Mini Pumpkin Pie Crème Brûlée Tarts
Prep Time: 1 hour (includes dough chilling) Cook Time: 40-45 minutes Chill Time: 4 hours (minimum) Total Time: 5 hours 45 minutes Yield: 12 mini tarts Category: Dessert Method: Baking & Torching Cuisine: American / French Diet: Vegetarian
Essential Ingredients for Pumpkin Crème Brûlée Tarts
For the Buttery Tart Shells (Pâte Sablée):
- 1 1/2 cups all-purpose flour
- 1/2 cup powdered sugar
- 1/4 teaspoon kosher salt
- 1/2 cup (1 stick) very cold, unsalted butter, cut into small 1/4-inch cubes
- 1 large egg yolk
- 1 tablespoon ice-cold water
For the Silky Pumpkin Custard Filling:
- 1 can (15 ounces) 100% pure pumpkin puree (NOT pie filling)
- 3/4 cup heavy whipping cream
- 1/2 cup packed dark brown sugar
- 2 large eggs
- 1 large egg yolk
- 1 1/2 teaspoons vanilla extract
- 1 teaspoon ground cinnamon
- 1/2 teaspoon ground ginger
- 1/4 teaspoon ground nutmeg
- 1/4 teaspoon ground allspice (or a pinch of cloves)
- 1/2 teaspoon kosher salt
For the Crème Brûlée Topping:
- Approx. 1/2 cup superfine sugar (or regular granulated sugar)
Ingredients Notes
- Pumpkin Puree: I must say this every time: do not buy pumpkin pie filling! You need the can that says 100% Pure Pumpkin. The pie filling is already sweetened and spiced and will ruin the texture of our rich custard.
- Heavy Cream: This is the key to that silky, crème-brûlée-like texture. Do not substitute with milk or half-and-half; it won’t be rich enough to set up as firmly.
- The Crust: We’re making a “pâte sablée,” which is a French shortbread crust. It’s crisper, sandier, and more like a buttery cookie than a flaky pie crust, making it the perfect sturdy base for these tarts.
- Superfine Sugar: For the topping, superfine (or “caster”) sugar is the professional’s choice because it melts incredibly quickly and evenly. If you can’t find it, just pulse regular granulated sugar in your food processor a few times, or just use regular granulated sugar.
How to Make Mini Pumpkin Pie Tarts from Scratch
- Make the Tart Dough: In a food processor, pulse the flour, powdered sugar, and salt. Add the very cold butter cubes and pulse 10-12 times until the mixture looks like coarse, sandy crumbs. In a small bowl, whisk the egg yolk and 1 tablespoon of ice water; drizzle this into the processor and pulse just until the dough starts to clump together.
- Chill the Dough: Do not over-mix! Dump the shaggy dough onto a piece of plastic wrap and use the wrap to press it into a 1-inch thick disk. Wrap it tightly and chill in the refrigerator for at least 30 minutes (or up to 2 days).
- Prepare Your Pans: You’ll need 12 individual, 3-inch mini tart pans with removable bottoms. These are a great kitchen investment. Lightly grease them.
- Roll and Form the Shells: Divide the chilled dough into 12 equal pieces. On a lightly floured surface, roll each piece into a small circle (about 4 inches wide) and gently press it into one of your mini tart pans. Press the dough firmly into the bottom and up the fluted sides. Trim any excess dough by rolling your rolling pin over the sharp top edge of the pan.
- Freeze and Blind Bake: Place the 12 tart shells on a baking sheet and freeze for 15-20 minutes. While they freeze, preheat your oven to 375°F (190°C).
- The Blind Bake: Line each frozen tart shell with a small square of parchment paper or a cupcake liner. Fill it with pie weights, dried beans, or uncooked rice. Bake for 15 minutes. Carefully remove the parchment and weights.
- Finish the Shells: Use a fork to gently prick the bottom of each tart shell (this stops them from puffing). Return the empty shells to the oven and bake for another 10-12 minutes, until they are dry and a light golden brown. Let them cool completely on a wire rack.
- Make the Pumpkin Custard: Lower your oven temperature to 325°F (163°C). In a large bowl, whisk together the pumpkin puree, dark brown sugar, vanilla, all the spices, and salt until smooth.
- Finish the Custard: Add the 2 eggs and 1 egg yolk and whisk until just combined. Do not over-beat, as this adds too much air. Gently whisk in the heavy cream until the mixture is uniform and silky.
- Fill and Bake: Place your 12 cooled, blind-baked tart shells (still on the baking sheet) and divide the pumpkin custard evenly among them. The filling should come almost to the top.
- Bake the Tarts: Carefully transfer the baking sheet to the 325°F oven. Bake for 20-25 minutes. The tarts are done when the edges are set and the very center has only a slight jiggle.
- CHILL COMPLETELY: This is the most important step for the final “crackle.” Let the tarts cool on the wire rack for 1 hour. Then, transfer the baking sheet to the refrigerator and chill, uncovered, for at least 4 hours, or overnight. They must be cold.
- The Crème Brûlée Moment: Right before serving, remove the tarts from their pans (this is why removable bottoms are amazing!). Place them on a heat-proof serving platter or a metal baking sheet.
- Torch the Tarts: Dab the top of each cold tart with a paper towel to remove any condensation. Sprinkle about 2 teaspoons of superfine sugar in a thin, even layer over the top of one tart.
- Ignite! Hold your kitchen torch a few inches away and, using a sweeping, circular motion, heat the sugar until it melts, bubbles, and turns a deep, dark amber color. Stop just before it smokes. Repeat with the remaining tarts and serve immediately.
Alternative Recipe: No-Bake Pumpkin Crème Brûlée Cups
Don’t have mini tart pans? No problem. You can get a very similar, and equally delicious, result using small glass ramekins or mason jars. This is a 100% no-bake, stress-free version.
Alternative Ingredients:
- 1 1/2 cups gingersnap cookie crumbs
- 6 tablespoons unsalted butter, melted
- 1 package (8 ounces) full-fat cream cheese, softened
- 1 can (15 ounces) 100% pure pumpkin puree
- 1 cup powdered sugar
- 1 1/2 teaspoons pumpkin pie spice
- 1 cup cold heavy whipping cream
- 1/2 cup superfine sugar (for topping)
Instructions for the Alternative Recipe:
- Make the Crust: In a bowl, mix the gingersnap crumbs and melted butter. Press this mixture firmly into the bottom of 6-8 small ramekins or glass jars. Chill in the fridge.
- Make the Cheesecake Filling: In a large bowl, beat the softened cream cheese with an electric mixer until smooth. Add the pumpkin puree, powdered sugar, and pumpkin pie spice, and beat until fully combined.
- Whip and Fold: In a separate, chilled bowl, beat the heavy cream until stiff peaks form. Gently fold the whipped cream into the pumpkin-cream cheese mixture until no streaks remain.
- Fill and Chill: Spoon the no-bake cheesecake filling evenly over the crusts in your ramekins.
- Chill Completely: Cover and refrigerate for at least 6 hours or overnight.
- Torch and Serve: Just before serving, dab the tops dry, sprinkle with superfine sugar, and torch them just like the tarts. Serve immediately.
Storage Options
This is a two-part storage situation.
Before Torching: The baked and un-torched tarts are the perfect make-ahead dessert. Store them, uncovered or very loosely covered, in the refrigerator for up to 2 days. Keeping them uncovered prevents condensation from forming, which is the enemy of a crisp sugar shell.
After Torching: You cannot store the tarts after you torch them. The crème brûlée magic is temporary. That beautiful, glassy shell will absorb moisture from the custard and the air, and within a few hours, it will turn into a soft, weepy, sugar-sludge. They must be torched and served immediately (within 30 minutes is ideal).
Variations and Substitutions
- Crust Swap: If you’re short on time, you can use store-bought refrigerated pie dough. It will be more of a “flaky” pie crust than a “crisp” tart shell, but still delicious. A graham cracker crust (like the alternative recipe) also works.
- Spice it Up: Add 1/8 teaspoon of ground cardamom or a tiny pinch of cayenne pepper to the pumpkin custard for a modern, spicy kick.
- Make it Boozy: Add one tablespoon of high-quality bourbon, dark rum, or brandy to the pumpkin custard when you add the vanilla. It adds an incredible layer of warmth.
- Topping Flavor: Mix a tiny pinch of cinnamon or flaky sea salt into your superfine sugar before torching for a “salted caramel” vibe.
Practical & Valuable Tips
Tip 1: Invest in a Kitchen Torch. I know you’re asking if you can use your oven’s broiler. The answer is… please don’t. A broiler is a blast of heat from one direction. It will melt your entire tart and turn the custard into soup before the sugar even caramelizes. A good kitchen torch is a fantastic, affordable tool (hello, high-value keyword) that gives you precise, intense heat exactly where you need it.
Tip 2: Cold Tarts, Even Sugar. The tarts must be cold from the fridge. This protects the custard from melting. And the sugar layer must be thin and even. A thick pile of sugar will just burn on top while staying raw underneath.
Tip 3: Don’t Skip the Blind Bake. I know it’s an extra step, but it is the only way to guarantee a crisp, buttery tart shell. If you pour wet custard into a raw shell, you will get a soggy, pale, and sad bottom.
Tip 4: Keep Your Torch Moving. When you’re torching, never hold the flame in one spot. Keep it moving in slow, constant circles, like you’re spray-painting the sugar. This ensures even caramelization and prevents that one dreaded black, burnt spot.
Frequently Asked Questions
- Do I really, really need a kitchen torch? Yes. I promise you, it’s the only way to get that authentic, shattering “crème brûlée” glass. The broiler method is a recipe for disaster. A good torch is your ticket to looking like a dessert superhero.
- Can I make these in a standard muffin tin? You can, but it’s much harder. The shortbread crust is tricky to get out of a muffin tin. If you must, I’d recommend using cupcake liners or just making the “No-Bake” version in ramekins. The mini tart pans with removable bottoms are truly the right tool for this job.
- Why did my custard crack when it baked? A crack usually means one of two things: you over-baked it, or you over-mixed the eggs. Whisk the eggs just until combined. Too much air will make them puff up like a soufflé and then collapse and crack as they cool.
- Can I make one big 9-inch pie instead? Yes! Use the same crust and filling in a 9-inch deep-dish tart pan. You will need to blind-bake the large shell for longer (about 20-25 minutes with weights, 10-15 without). The filling will need to bake for 35-45 minutes at 325°F.
- My sugar topping didn’t get hard and crackly! What went wrong? The most likely culprit is moisture. You must pat the tops of the cold tarts dry with a paper towel before adding the sugar. If there’s any condensation, the sugar will just absorb it and turn to syrup instead of caramelizing into glass.
This Mini Pumpkin Pie Recipe is so much more than a dessert. It’s a fun, interactive, and incredibly delicious experience that will be the absolute star of your dessert table.
If you’re ready to win the holiday and create a truly showstopping, fun Thanksgiving dessert, this is your recipe. Be sure to save this post and pin it to your favorite fall baking board on Pinterest. You’re going to want to find it again! Happy torching!


Leave a Comment