Have you ever found yourself in the middle of a serious dessert dilemma? It’s that classic, heart-wrenching choice: do you crave the chewy, buttery goodness of a classic chocolate chip cookie, or the rich, fudgy decadence of a perfect brownie? What if I told you that you never have to choose again?
Welcome to the world of the Cookie Brownie Bar, the legendary dessert mashup affectionately known as the “Brookie.” This is the simple dessert solution that gives you the absolute best of both worlds in every single bite. We’re talking about a dense, deeply chocolatey brownie base topped with a generous layer of golden, chewy chocolate chip cookie dough, baked together into one pan of pure perfection.
Get ready to end the great dessert debate once and for all. This recipe is your guide to creating the most impressive, crowd-pleasing baked good you’ve ever made. It’s time to embrace the delicious harmony of cookies and brownies together.
What Makes the Perfect Cookie Brownie Bars?
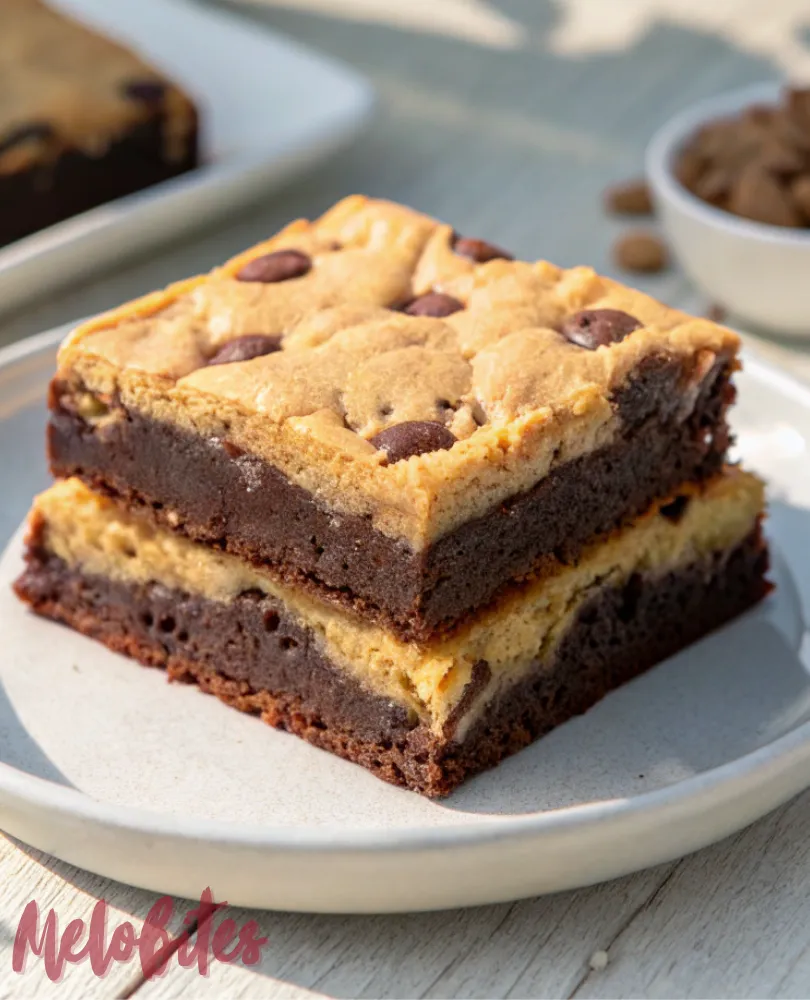
The secret to truly exceptional cookie brownie bars is all about achieving the perfect balance between the two layers. It’s a delicious feat of engineering where each component must be stellar on its own yet work in harmony with the other. The brownie layer can’t be cakey; it must be intensely fudgy and dense to provide a stable, rich foundation.
On top, the cookie layer needs to be perfectly chewy, with buttery brown sugar notes and plenty of melted chocolate chips. It shouldn’t be too crispy or too doughy, but rather bake into a soft, golden blanket over the brownie. When you get this textural contrast right, you create a dessert experience that is simply unforgettable.
A Fudgy Brownie Base Makes This a Standout Simple Dessert
While the cookie topping gets a lot of attention, the foundation of any great brookie is its fudgy brownie base. This isn’t the place for a light, airy, or cake-like brownie that will get lost in the mix. Among all the simple dessert recipes out there, this one stands out because it starts with a brownie recipe designed for pure, unadulterated richness.
By using melted butter and a generous amount of cocoa, we create a dense, moist brownie that provides the perfect chocolatey counterpoint to the sweet cookie layer. This one-bowl brownie base is incredibly easy to whip up, proving that you don’t need complicated steps to build a truly show-stopping dessert. The quality of the base is what makes the entire bar a success.
The Definitive Recipe for Cookies and Brownies Together
When you’re looking for the best cookies and brownies together recipe, you need one that has been tested and perfected to ensure both layers bake correctly. Baking two different batters in one pan can be tricky, but this recipe is formulated so the brownie sets up perfectly while the cookie dough bakes to a chewy, golden-brown finish. This is the definitive blueprint for brookie success.
This isn’t just a matter of slapping some cookie dough on a brownie; it’s about creating a cohesive dessert where the flavors and textures meld beautifully. The chocolate chips in the cookie layer get delightfully melty, while the deep chocolate of the brownie base anchors every bite. This is the recipe that turns a fun idea into a seriously delicious reality.
Why You’ll Love These Cookie Brownie Bars
- Two Desserts in One: It’s the ultimate solution when you can’t decide, delivering the best of cookies and brownies in a single, glorious bar.
- Incredible Texture Combination: You get the dense, fudgy chew of a brownie and the soft, buttery bite of a chocolate chip cookie all at once.
- Perfect for Sharing: Cut into squares, these bars are the ideal dessert for coworkers, potlucks, bake sales, or any gathering where you want to impress.
- Surprisingly Simple to Make: Despite looking complex, the recipe uses two straightforward, easy-to-follow components that come together in one pan.
- A True Crowd-Pleaser: This is a guaranteed hit with everyone, from kids to adults. Be prepared for an empty pan and a flood of recipe requests.
Nutritional Benefits? Let’s Call It a Happiness Portfolio
Let’s be wonderfully honest: you are not making cookie brownie bars for the health benefits. This is a dessert that falls squarely into the category of “making life better.” Think of each bar as a delicious investment in your happiness portfolio, with guaranteed high returns of joy.
This is the perfect treat to reward yourself after a long week or to share with coworkers to boost office morale. The simple act of baking and sharing something so delicious is a powerful connector and a certified mood-booster. The primary nutritional benefit here is pure, unadulterated comfort.
Full Recipe: The Ultimate Cookie Brownie Bars (Brookies)

Prep Time: 25 minutes • Cook Time: 35-40 minutes • Total Time: 1 hour 5 minutes • Yield: 16-20 bars • Category: Dessert • Method: Baking • Cuisine: American • Diet: Vegetarian
Essential Ingredients for Cookie Brownie Bars
For the Fudgy Brownie Layer:
- 1/2 cup (113g) Unsalted Butter, melted
- 1 cup (200g) Granulated Sugar
- 2 large Eggs
- 1 teaspoon Vanilla Extract
- 1/2 cup (60g) All-Purpose Flour
- 1/3 cup (30g) Unsweetened Cocoa Powder
- 1/4 teaspoon Baking Powder
- 1/4 teaspoon Salt
For the Chocolate Chip Cookie Layer:
- 1/2 cup (113g) Unsalted Butter, softened
- 1/4 cup (50g) Granulated Sugar
- 1/2 cup (110g) Packed Light Brown Sugar
- 1 large Egg
- 1/2 teaspoon Vanilla Extract
- 1 1/4 cups (150g) All-Purpose Flour
- 1/2 teaspoon Baking Soda
- 1/4 teaspoon Salt
- 1 cup (170g) Semisweet Chocolate Chips
Ingredient Notes
- Melted vs. Softened Butter: This is key! We use melted butter in the brownie layer to create a dense, fudgy texture. For the cookie layer, softened butter is creamed with the sugars to create a chewier, more traditional cookie texture.
- Brown Sugar: The brown sugar in the cookie dough is essential for that classic chewy texture and caramel-like flavor. Don’t substitute it!
- Two Types of Leavening: The brownie layer uses a tiny bit of baking powder for a slight lift, while the cookie layer uses baking soda, which reacts with the brown sugar to help it spread and stay soft.
How to Make The Ultimate Cookie Brownie Bars
- Prep Your Oven and Pan: Preheat oven to 350°F (175°C). Grease a 9×13 inch baking pan and line it with parchment paper, leaving an overhang on the sides to easily lift the bars out later.
- Make the Brownie Batter: In a large bowl, whisk together the melted butter and granulated sugar. Beat in the eggs one at a time, then stir in the vanilla. In a separate small bowl, whisk together the flour, cocoa powder, baking powder, and salt, then add the dry ingredients to the wet ingredients, stirring until just combined.
- Spread the Brownie Layer: Pour the brownie batter into the prepared pan and use a spatula to spread it into an even layer.
- Make the Cookie Dough: In a separate large bowl (or the bowl of a stand mixer), beat the softened butter with the granulated sugar and brown sugar until light and fluffy. Beat in the egg and vanilla. In another small bowl, whisk together the flour, baking soda, and salt, then gradually add this to the butter mixture, mixing on low until just combined. Stir in the chocolate chips.
- Layer the Cookie Dough: Take spoonfuls of the cookie dough and drop them evenly over the top of the brownie batter. You don’t need to spread it perfectly; it will spread out as it bakes, leaving some brownie peeking through.
- Bake to Perfection: Bake for 35-40 minutes, or until the edges are set and a toothpick inserted into the center comes out with moist crumbs, not wet batter. The cookie layer should be golden brown.
- Cool Completely: This is the most important step! Allow the cookie brownie bars to cool completely in the pan on a wire rack before lifting them out and slicing. This ensures clean cuts and allows the fudgy brownie layer to set properly.
Alternative Recipe: The Ultimate Peanut Butter Brookie
For an incredible peanut butter and chocolate mashup, make the brownie base as directed. For the cookie layer, use your favorite peanut butter cookie dough recipe instead of the chocolate chip cookie dough. You can also swap the semisweet chocolate chips for peanut butter chips or Reese’s Pieces for an extra punch of peanut butter flavor.
Storage Options
Store your cookie brownie bars in an airtight container at room temperature. They will stay fresh and delicious for up to 4 days. Storing them in the refrigerator can dry them out, so room temperature is best for maintaining that perfect chewy-fudgy texture.
Variations and Substitutions
Feel free to customize these bars to your liking. Add a cup of chopped walnuts or pecans to the brownie batter for a nutty crunch. You can swap the semisweet chocolate chips in the cookie layer for dark chocolate, milk chocolate, or even white chocolate chips. For an extra decadent touch, sprinkle a little flaky sea salt over the top before baking.
Practical & Valuable Tips
- Don’t Overbake: This is the number one rule for brookies. An overbaked bar will result in a dry brownie and a crispy cookie. It’s better to err on the side of slightly underdone, as they will continue to set as they cool.
- The Parchment Sling is Your Friend: Leaving an overhang of parchment paper is a game-changer. It allows you to lift the entire slab of brookies out of the pan at once, making slicing them into neat squares a breeze.
- Patience is Key: You absolutely must let the bars cool completely before cutting. A warm brookie is a gooey mess (a delicious mess, but a mess nonetheless). For ultra-clean cuts, you can even chill the cooled bars in the fridge for 30 minutes before slicing.
Frequently Asked Questions
- Can I use a boxed brownie mix or store-bought cookie dough? Yes, you can use this recipe as a method for combining store-bought mixes for a super quick dessert. Just prepare the brownie mix as directed for a 9×13 pan, then top with spoonfuls of refrigerated cookie dough and bake according to the brownie box instructions, adding a few extra minutes as needed.
- How do I know when the brookies are done baking? Look for visual cues. The edges should be set and slightly pulled away from the sides of the pan, and the cookie dough on top should be a light golden brown. A toothpick test in the center should yield moist crumbs, not liquid batter.
- My brownie layer seems dry. What went wrong? A dry brownie layer is almost always a result of overbaking. Ovens can vary, so start checking for doneness a few minutes earlier than the recipe suggests. Remember, the residual heat will continue to cook the bars after you pull them from the oven.
- Can I bake this in an 8×8 or 9×9 inch pan? You can, but the bars will be much thicker, and you will need to significantly increase the baking time. Start checking for doneness around the 45-minute mark, but it could take closer to an hour.
- Can I freeze cookie brownie bars? Yes, they freeze beautifully! Once completely cooled, slice them into bars, wrap each one individually in plastic wrap, and then place them in a freezer-safe bag. They will keep for up to 3 months.
These Ultimate Cookie Brownie Bars are the perfect, simple dessert for when you want it all. Go ahead and indulge in the best of both worlds!
Ready to end the dessert debate forever? Pin this incredible recipe to your must-bake board on Pinterest and share the delicious decision with all of your friends!


Leave a Comment