

Let’s talk about a food that is universally adored, a true icon of comfort food that brings a smile to faces of all ages: the humble chicken tender. There is something so satisfying about that perfect, golden-brown crunch giving way to juicy, tender chicken. But for so many of us, that delicious experience is associated with deep-frying, a messy and often unhealthy cooking method.
What if you could achieve that same incredible, shatteringly crisp crust right in your own oven? What if you could create a healthier, cleaner version of your favorite comfort food without sacrificing a single bit of that satisfying crunch? Today, I’m going to show you exactly how to do it with this foolproof recipe.
This guide will walk you through all the simple secrets to making the best baked chicken tenders you’ve ever had. They are perfect for a family dinner, a fun appetizer, or for your weekly meal prep. Get ready to fall in love with a healthier way to enjoy one of life’s greatest simple pleasures.
The Quest for Perfect Crispy Baked Chicken Tenders
Our primary mission with this recipe is to create truly Crispy Baked Chicken Tenders that can stand up to their fried counterparts. The magic is all in the coating, a simple but effective mixture designed to become incredibly crunchy in the oven’s dry heat. We use Japanese-style Panko breadcrumbs, which are the undisputed champion for creating a light, airy, and ultra-crispy texture that will have everyone reaching for more.
The Ultimate Healthy Chicken Nugget Recipe for Easy Family Dinners
This recipe is, without a doubt, the ultimate healthy chicken nugget recipe you will find. By baking the tenders on a wire rack, we allow the hot air to circulate and the fat to drip away, resulting in a much lighter and healthier meal. This makes it one of the most perfect easy family dinners, especially for those with picky eaters who will adore this familiar and delicious meal.
Your Guide: How to Get a Crispy Coating on Chicken Without Frying
Have you ever wondered how to get a crispy coating on chicken without frying? The secret lies in three simple but essential techniques that guarantee a crunchy result every time. First, you must use Panko breadcrumbs, as their larger, flakier texture creates a much crispier coating than regular breadcrumbs. Second, you need to bake the chicken at a high temperature, and third, placing the tenders on a wire rack is crucial for allowing hot air to circulate all around them, ensuring a 360-degree crunch.
Why You’ll Love These Crispy Baked Chicken Tenders
You are going to absolutely love this recipe because it delivers all the satisfying crunch of fried chicken in a much healthier package. This baked version uses a fraction of the oil, making it a guilt-free choice that you can feel great about serving to your family. The cleanup is also a dream come true, with no big pots of splattering oil to deal with, just a simple baking sheet to wash.
Nutritional Benefits
This dish is a fantastic way to enjoy a beloved comfort food while still sticking to a healthy lifestyle. By baking the chicken instead of frying, you dramatically reduce the overall fat and calorie content of the meal. Chicken breast is an excellent source of lean protein, which is vital for muscle growth and keeping you feeling full and satisfied. Making these from scratch also means you have complete control over the ingredients, avoiding the excess sodium and preservatives often found in store-bought frozen varieties.
Full Recipe
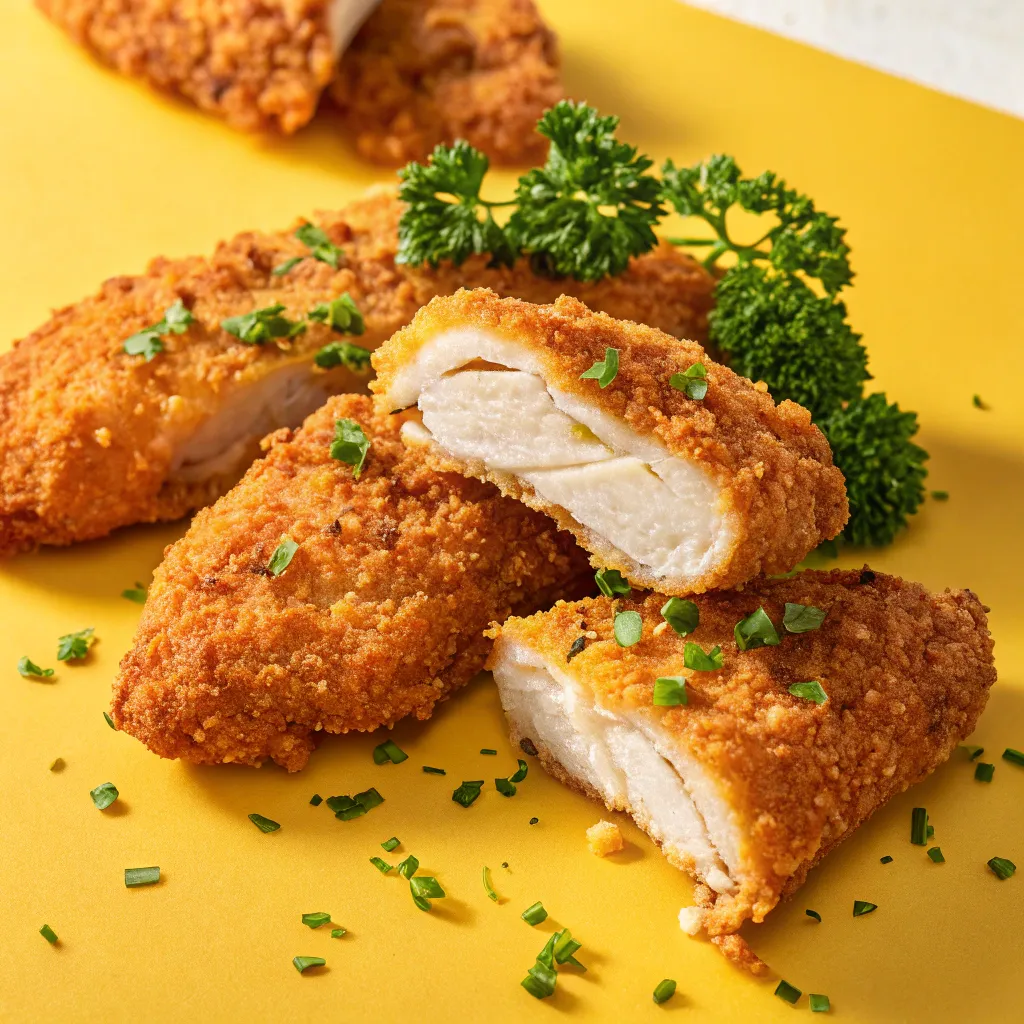
Ready to create the crispiest, juiciest baked chicken tenders of your life? This comprehensive guide will walk you through every simple step, sharing all the tips and tricks you need for a perfect, foolproof result. We will cover everything from preparing the chicken to setting up the perfect breading station. Get ready to make a healthy dinner that your entire family will request again and again.
This recipe for crispy baked chicken tenders is a healthier take on a classic comfort food, perfect for picky eaters and easy family dinners. The Panko breadcrumb coating bakes up to a perfect golden-brown crunch in the oven, while the chicken inside stays incredibly juicy and tender.
Prep Time: 20 minutes | Cook Time: 20 minutes | Total Time: 40 minutes | Yield: 4-6 servings | Category: Dinner, Main Course, Appetizer | Method: Baking | Cuisine: American | Diet: N/A
Essential Ingredients for Crispy Baked Chicken Tenders
This family-favorite recipe comes to life with just a handful of simple pantry staples.
- Chicken: 1 kg (about 2 lbs) boneless, skinless chicken breast, cut into tenders
- Flour: 1 cup all-purpose flour
- Eggs: 2 large eggs
- Panko Breadcrumbs: 2 cups Japanese-style Panko breadcrumbs
- Seasoning:
- 2 teaspoons smoked paprika
- 1 teaspoon garlic powder
- 1 ½ teaspoons salt
- 1 teaspoon black pepper
- Fat: Olive oil spray or melted butter
Ingredients Notes
A little more insight into our key ingredients will ensure your chicken tenders are a roaring success.
- The Chicken Tenders: You can either buy pre-cut chicken tenderloins for convenience or simply create your own by slicing boneless, skinless chicken breasts into uniform strips about 1.5 inches wide. Pounding the strips to an even thickness of about ½ inch is a great optional step that will help them cook even more evenly. No matter which you use, be sure to pat them completely dry before you begin the breading process.
- The Panko Breadcrumbs: This is the most important ingredient for achieving that super crispy texture. Panko breadcrumbs are lighter and flakier than traditional breadcrumbs, which allows them to absorb less oil and become incredibly crunchy when baked. You can find them in the baking or international aisle of most major supermarkets, and they are well worth seeking out.
- The Seasoning: We are using a simple but incredibly flavourful and kid-friendly seasoning blend. The smoked paprika provides a beautiful colour and a subtle, smoky flavour that mimics the taste of fried food. The garlic powder and salt provide the essential savory foundation that makes the crust so delicious.
How to Make Crispy Baked Chicken Tenders
Let’s walk through the simple, fun, and foolproof process for creating these amazing baked tenders.
- Step 1: Prepare the Oven and Baking Setup. First, preheat your oven to a hot 220°C (425°F). Place an oven-safe wire rack inside a large, rimmed baking sheet. This wire rack setup is crucial for getting the tenders crispy on all sides.
- Step 2: Create Your Three-Step Breading Station. You will need three separate shallow dishes. In the first dish, whisk together the all-purpose flour, salt, and pepper. In the second dish, beat the two eggs until they are smooth. In the third dish, combine the Panko breadcrumbs, smoked paprika, and garlic powder, and mix them well.
- Step 3: Bread the Chicken Tenders. Working with one chicken tender at a time, follow this three-step process. First, dredge the tender in the seasoned flour, making sure it’s lightly coated on all sides, then gently shake off any excess. Next, dip the flour-coated tender completely into the beaten egg, allowing any excess to drip off. Finally, press the tender firmly into the Panko breadcrumb mixture, ensuring a thick and even coating all over.
- Step 4: Arrange on the Rack. As you bread each chicken tender, place it in a single layer on the prepared wire rack on your baking sheet. Be sure to leave a little bit of space between each tender to allow the hot air to circulate properly.
- Step 5: Add Fat for Crisping and Color. Once all the tenders are on the rack, lightly spray the tops of them with olive oil spray or gently drizzle them with a little melted butter. This small amount of fat is essential for helping the Panko breadcrumbs to turn a beautiful golden brown and become extra crispy in the oven.
- Step 6: Bake to Golden-Brown Perfection. Place the baking sheet in the hot oven and bake for 15-20 minutes, flipping the tenders halfway through the cooking time. The tenders are done when they are deeply golden brown, crispy to the touch, and the chicken is cooked through.
- Step 7: Cool and Serve. Let the baked chicken tenders cool on the rack for a few minutes before serving. This will help the crust to set and become even crispier. Serve hot with your family’s favourite dipping sauces.
Storage Options
These baked chicken tenders are fantastic for making ahead, and they store and reheat beautifully. For leftovers, allow the tenders to cool completely, then store them in an airtight container in the refrigerator for up to 4 days. The best way to reheat them and bring back their signature crunch is in an air fryer or a hot oven for a few minutes.
For long-term storage, these are a perfect freezer-friendly meal. After baking and cooling, arrange the tenders in a single layer on a baking sheet and flash-freeze them until solid, about 1-2 hours. Once frozen, you can transfer them to a freezer-safe zip-top bag, where they will keep for up to 3 months for a quick and healthy homemade meal anytime.
Variations and Substitutions
This simple recipe is a fantastic starting point that you can easily customize to your family’s tastes. For a cheesy twist, you can add about ½ cup of finely grated Parmesan cheese to your Panko breadcrumb mixture, which will add a wonderful, salty, and nutty flavour to the crust. If your family enjoys a bit of heat, you can add ¼ to ½ teaspoon of cayenne pepper or chili powder to the seasoning blend. To make this recipe completely gluten-free, simply substitute the all-purpose flour with a gluten-free blend and use gluten-free Panko breadcrumbs.
Practical & Valuable Tips
For the absolute crispiest results, there are three tips to always remember. First, always pat your raw chicken tenders completely dry with paper towels before you begin the breading process, as moisture is the enemy of a crispy crust. Second, never overcrowd your baking sheet; give the tenders plenty of space for the hot air to circulate around them. Finally, do not skip using the wire rack, as it is the key to preventing the bottoms of the tenders from becoming soggy as they bake.
Frequently Asked Questions
Why did all the breading fall off my chicken tenders? This is a common problem that is usually caused by either the chicken being too wet before breading, or by skipping the essential first step of dredging in flour. The flour gives the egg something to cling to, and the egg acts as the glue for the Panko breadcrumbs. Following the three-step breading process carefully is the key to a crust that stays put.
My baked tenders weren’t very crispy. What did I do wrong? A lack of crispiness is almost always due to one of three things: your oven wasn’t hot enough, you didn’t use Panko breadcrumbs, or you didn’t use a wire rack. A hot oven is essential for crisping, Panko provides a superior crunch, and the wire rack ensures the bottom of the tenders get crispy too.
Can I make these chicken tenders in an air fryer instead of the oven? Yes, an air fryer is a fantastic tool for making these tenders even crispier! Preheat your air fryer to 200°C (400°F). Arrange the breaded tenders in a single layer in the basket, spray with a little oil, and cook for about 10-12 minutes, flipping halfway through, until they are golden brown and cooked through.
Can I prepare these ahead of time and keep them in the fridge before baking? It is generally not recommended to bread the chicken and let it sit in the refrigerator for too long before baking. The moisture from the raw chicken and the egg wash can start to seep into the breadcrumb coating, which can result in a soggy crust. For the best and crispiest result, it’s always best to bread and bake the chicken right away.
What are the best dipping sauces to serve with these tenders? The possibilities are endless and this is part of the fun! Classic choices that are always a hit with kids include tomato ketchup, BBQ sauce, and a simple honey mustard. For adults, a creamy ranch dip, a spicy aioli, or a sweet chili sauce would all be fantastic accompaniments.
Conclusion
This recipe for Kid-Friendly Crispy Baked Chicken Tenders is your ultimate solution for a happy, healthy, and stress-free family dinner. It’s a dish that proves that you can have the satisfying crunch and delicious flavour of a beloved comfort food in a much healthier, home-cooked way. It will bring joy to your kids and peace of mind to you, a true win-win at the dinner table. This Crispy Baked Chicken Tenders recipe is a keeper for any family. If you love these fresh and zesty flavours, don’t forget to share it and save it to your favorite grilling board on Pinterest for later!




Leave a Comment